Introduction to Ultrasonic Sensors
Ultrasonic sensors have revolutionized distance measurement in electronics projects, offering a reliable and cost-effective solution for numerous applications. Among these, the HC-SR04 stands out as the most popular ultrasonic sensor in the maker community and DIY electronics world.
Whether you're building a robot, creating a security system, or developing an IoT device, understanding how to properly use the HC-SR04 can significantly expand your project capabilities. Unlike infrared sensors that struggle with certain surfaces and lighting conditions, ultrasonic sensors provide consistent performance across various environments.
How Ultrasonic Sensors Work: The Science Behind the Technology
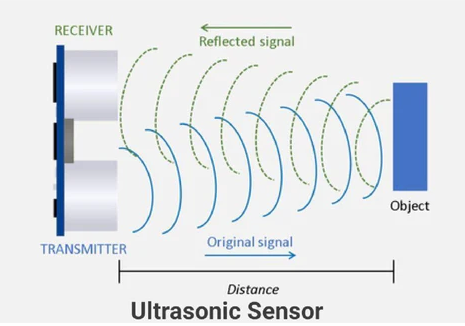
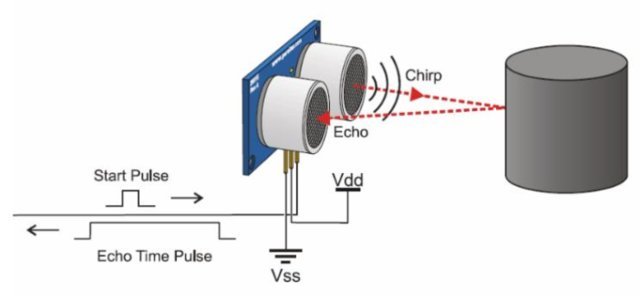
Ultrasonic sensors operate on a simple but clever principle known as echolocation - the same technique used by bats and marine animals to navigate their surroundings. These devices measure distance by calculating the time between sending a sound signal and receiving its echo.
The HC-SR04 contains two main components: a transmitter and a receiver. The transmitter emits high-frequency sound waves (typically 40kHz) that are inaudible to human ears. When these waves encounter an object, they bounce back toward the sensor. The receiver detects these returning echoes, and the sensor's electronics calculate the distance based on the time elapsed.
We divide by two because the sound travels to the object and back, covering twice the distance between the sensor and the object.
HC-SR04 Technical Specifications and Pinout
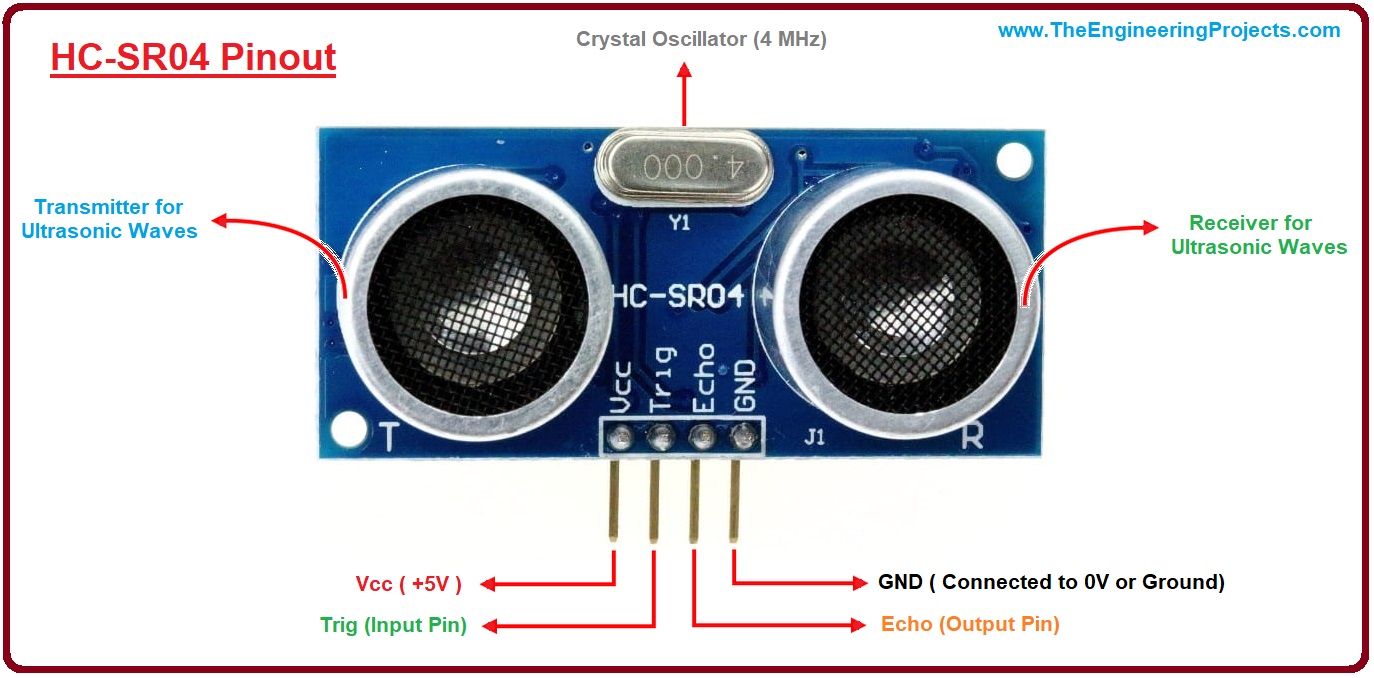
Before diving into connections and programming, let's examine the HC-SR04's technical specifications:
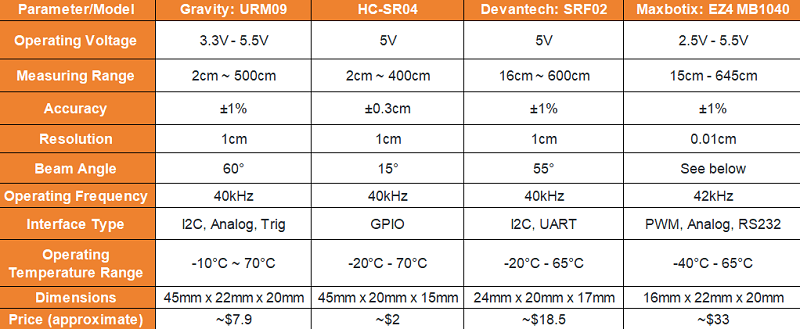
Operating Voltage
5V DC - Compatible with most Arduino boards and 5V microcontrollers
Measuring Range
2cm to 400cm (1" to 13 feet) with 0.3cm resolution
Operating Frequency
40kHz - Ultrasonic frequency inaudible to humans
Measurement Angle
15° cone - Objects outside this cone won't be detected reliably
The sensor features four pins:
- VCC: Power supply input (5V)
- Trig: Trigger input pin
- Echo: Echo output pin
- GND: Ground connection
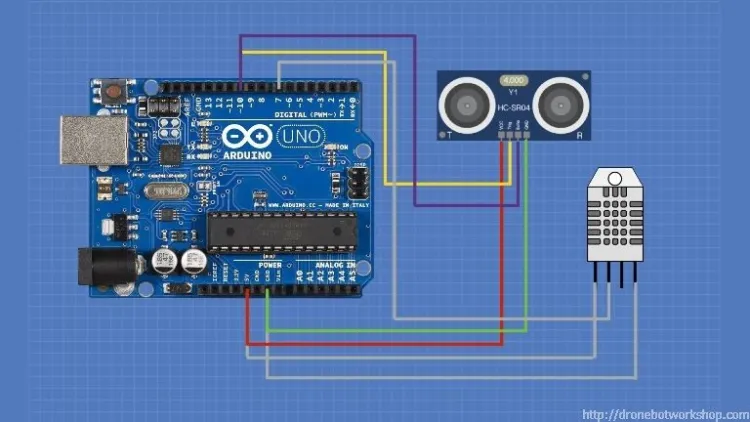
Wiring the HC-SR04 with Arduino
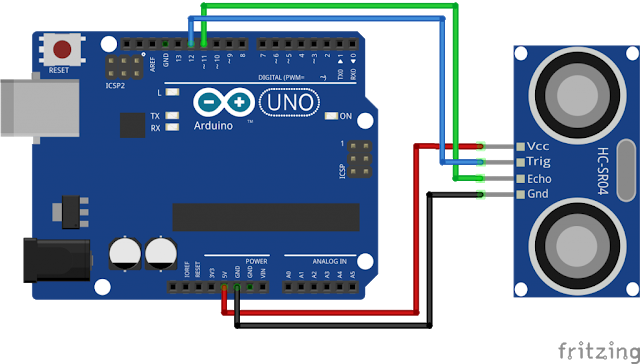
1 Basic Connection Guide
Connecting the HC-SR04 to an Arduino is straightforward. Follow these wiring instructions carefully:
- Connect the HC-SR04 VCC pin to the Arduino 5V pin
- Connect the HC-SR04 GND pin to the Arduino GND pin
- Connect the HC-SR04 Trig pin to Arduino digital pin 9
- Connect the HC-SR04 Echo pin to Arduino digital pin 10
Basic Arduino Code for Distance Measurement
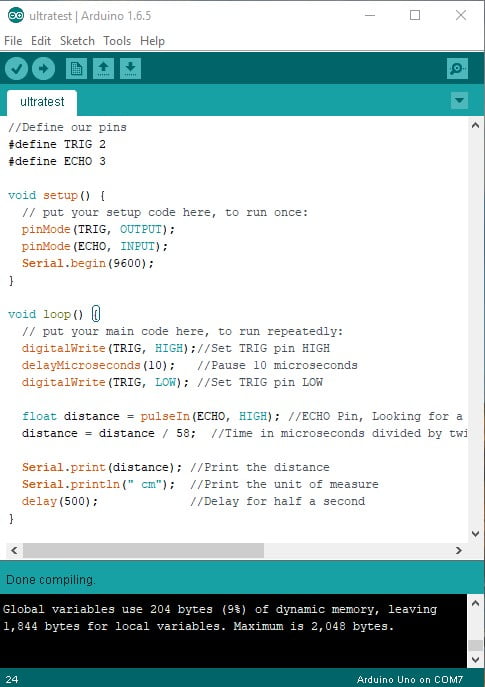
2 Complete Distance Measurement Code
Here's a complete Arduino sketch to get you started with distance measurement:
// Define pin connections
const int trigPin = 9;
const int echoPin = 10;
// Define variables for calculations
long duration;
int distance;
void setup() {
pinMode(trigPin, OUTPUT); // Sets trigPin as Output
pinMode(echoPin, INPUT); // Sets echoPin as Input
Serial.begin(9600); // Starts serial communication
Serial.println("HC-SR04 Distance Measurement Initialized");
}
void loop() {
// Clear trigPin condition
digitalWrite(trigPin, LOW);
delayMicroseconds(2);
// Trigger the sensor by setting trigPin HIGH for 10μs
digitalWrite(trigPin, HIGH);
delayMicroseconds(10);
digitalWrite(trigPin, LOW);
// Read echoPin, returns the sound wave travel time in microseconds
duration = pulseIn(echoPin, HIGH);
// Calculate distance
distance = duration * 0.0343 / 2; // Speed of sound divided by 2
// Display results on Serial Monitor
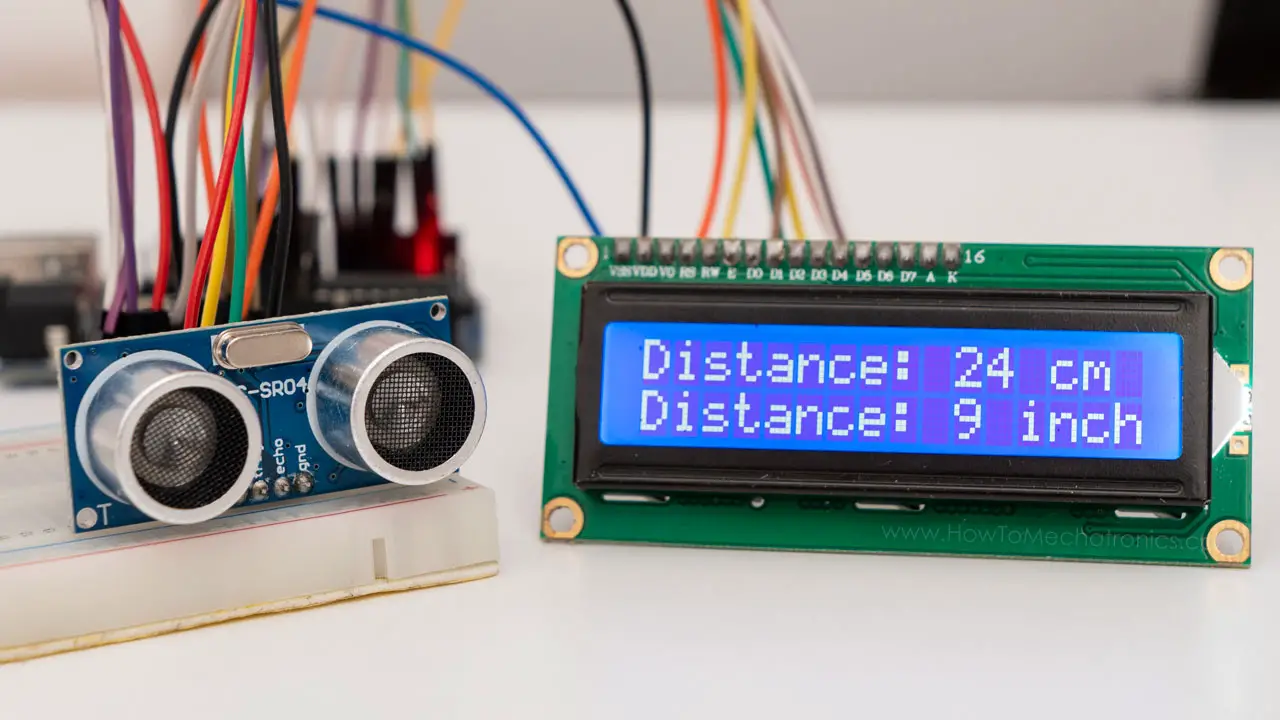
Serial.print("Distance: ");
Serial.print(distance);
Serial.println(" cm");
delay(1000); // Wait 1 second between measurements
}
Code Explanation: This code provides the foundation for all HC-SR04 applications. The pulseIn() function waits for the pin to go HIGH, starts timing, then waits for it to go LOW and stops timing, returning the pulse length in microseconds.
Improving Accuracy and Reliability
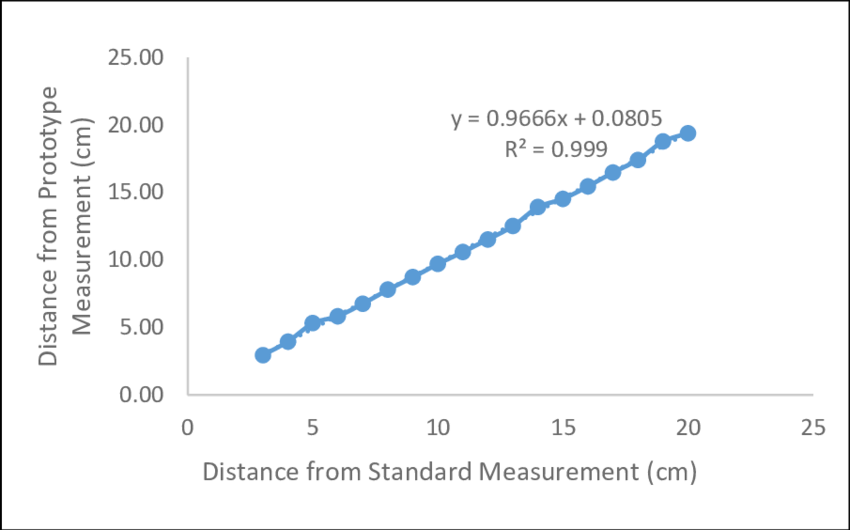
3 Advanced Accuracy Techniques
While the basic code works adequately, several factors can affect measurement accuracy:
Temperature Compensation
The speed of sound changes with air temperature. For precision applications, add a temperature sensor and adjust the speed of sound constant accordingly.
Multiple Readings Average
Single measurements can be affected by noise. Taking multiple readings and averaging them improves reliability significantly.
Error Handling
The sensor occasionally returns erroneous values. Implement validation checks to discard readings outside expected ranges.
Power Stability
Ensure stable 5V power. Voltage fluctuations significantly impact performance. Add capacitors near the sensor for better stability.
Advanced HC-SR04 Applications and Projects
The HC-SR04's versatility enables countless projects:
| Application | Description | Key Features |
|---|---|---|
| Smart Parking Sensor | Create a parking assistant that alerts drivers with audible beeps as they approach obstacles | Multiple sensors for comprehensive coverage |
| Home Security System | Implement motion detection that triggers alarms when objects enter a protected zone | Works in complete darkness, unaffected by temperature |
| Liquid Level Monitoring | Monitor water tanks without physical contact by mounting sensor at the top | Non-contact measurement prevents contamination |
| Robot Navigation | Equip robots with "eyes" that help them navigate environments autonomously | 360° awareness with multiple sensors |
| Gesture Recognition | Detect simple hand gestures by tracking hand position and movement patterns | Multiple sensors for 3D tracking |
Common Problems and Troubleshooting
Inconsistent Readings
Solution: Often caused by power supply issues. Ensure your power source provides adequate current (at least 1A for systems with multiple components).
Maximum Range Limitations
Solution: While the spec sheet claims 400cm, real-world performance typically achieves 200-300cm. For better range, ensure the target surface is perpendicular to the sensor.
False Triggers
Solution: Electrical noise can cause false readings. Shield cables, add capacitors near the sensor, and keep wiring away from motors or high-current devices.
No Readings
Solution: Check connections with a multimeter. The Trig pin should pulse HIGH for 10μs. Use an oscilloscope if available to verify the Echo pulse.
Comparison with Other Distance Sensors
While the HC-SR04 excels in many scenarios, other technologies might better suit specific needs:
| Sensor Type | Advantages | Disadvantages | Best For |
|---|---|---|---|
| HC-SR04 (Ultrasonic) | Low cost, good range (2-400cm), unaffected by light/color | Affected by temperature, soft surfaces absorb sound | General purpose, robotics, parking sensors |
| Infrared (IR) | High precision at short range, fast response | Affected by ambient light and surface color | Line following, short-range detection |
| LiDAR | Superior accuracy, scanning capabilities | Significantly more expensive, complex | Autonomous vehicles, 3D mapping |
| Time-of-Flight (ToF) | Fast measurements, digital interfaces | Shorter range, higher cost | Gesture recognition, proximity sensing |
Conclusion
The HC-SR04 ultrasonic sensor represents one of the most accessible and versatile components in the electronics hobbyist's toolkit. Its simple operation, combined with robust performance and low cost, makes it ideal for beginners and experts alike.
As you embark on your HC-SR04 journey, remember that successful implementation combines proper wiring, thoughtful code, and an understanding of the sensor's limitations. Start with the basic examples, then gradually incorporate advanced techniques as your confidence grows.