Introduction to HTTP Communication with ESP32
In this comprehensive guide, you'll learn how to implement HTTP GET and POST requests using the ESP32 microcontroller with Arduino IDE. These communication methods are essential for IoT projects that need to exchange data with web servers, APIs, or cloud services.
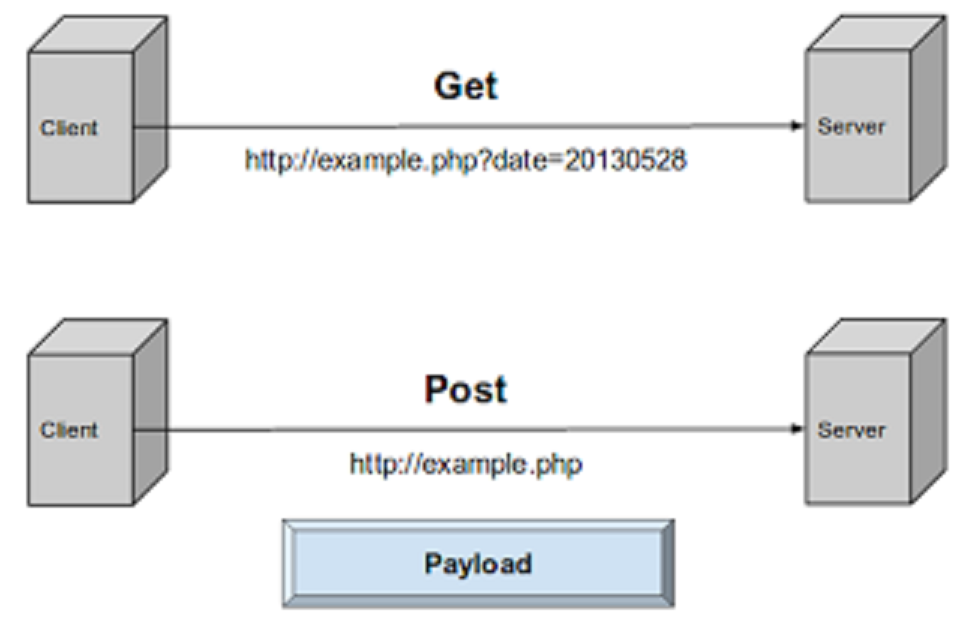
The Hypertext Transfer Protocol (HTTP) functions as a client-server request-response system. Here's a typical scenario:
- Your ESP32 acts as the client, sending an HTTP request to a server
- The server processes this request and returns a response
- The response contains status information and requested content
Understanding HTTP GET vs POST Methods
HTTP GET: Retrieving Data from Resources
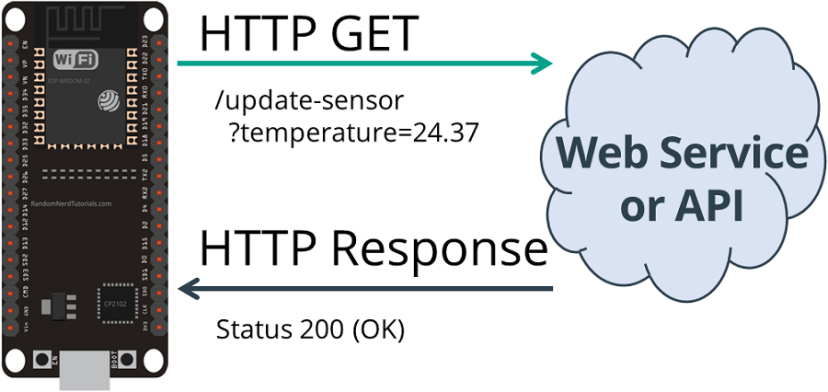
HTTP GET is designed specifically for requesting data from a specified resource. It's commonly used when you need to retrieve values from APIs or query parameters from a server. When using GET requests, any data you send becomes part of the URL itself.
GET /update-sensor?temperature=24.5&humidity=45
GET requests can also retrieve simple values or complex JSON objects without sending parameters:
GET /get-sensor-data
HTTP POST: Sending Data to Servers
HTTP POST is fundamentally different—it's used to send data to a server to create or update resources. This method is ideal for publishing sensor readings, submitting form data, or any operation that modifies data on the server.
POST /update-sensor HTTP/1.1
Host: example.com
Content-Type: application/x-www-form-urlencoded

api_key=your_key&sensor=living_room&temperature=24.5
For structured data, POST requests often use JSON format:
POST /update-sensor HTTP/1.1
Host: example.com
Content-Type: application/json

{"api_key": "your_key", "temperature": 24.5, "humidity": 45}
| Feature | HTTP GET | HTTP POST |
|---|---|---|
| Primary Use | Retrieve data | Send data to server |
| Data Location | URL parameters | Request body |
| Data Visibility | Visible in URL | Hidden in body |
| Security | Less secure for sensitive data | More secure (with HTTPS) |
Prerequisites and Setup
Essential Requirements
- Arduino IDE with ESP32 Support: Latest Arduino IDE with ESP32 board package
- Arduino_JSON Library: Install via Library Manager
- WiFi Library: Built-in WiFi.h for ESP32
- HTTPClient Library: Built-in HTTPClient.h for ESP32
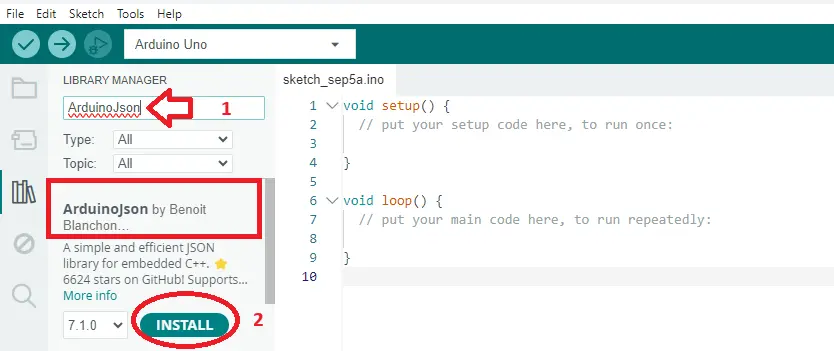
1 Install Required Libraries
Open Arduino IDE and navigate to Sketch > Include Library > Manage Libraries. Search for and install the following libraries:
- Arduino_JSON by Arduino
Implementing ESP32 HTTP GET Requests
2 Basic HTTP GET Request Structure
Here's a complete example of an ESP32 making HTTP GET requests to a server:
#include <WiFi.h>
#include <HTTPClient.h>

const char* ssid = "YOUR_WIFI_SSID";
const char* password = "YOUR_WIFI_PASSWORD";

String serverName = "http://your-server.com/update-sensor";
unsigned long lastTime = 0;
unsigned long timerDelay = 5000;  // 5 seconds

void setup() {
  Serial.begin(115200);
  WiFi.begin(ssid, password);

  while(WiFi.status() != WL_CONNECTED) {
    delay(500);
    Serial.print(".");
  }

  Serial.println("Connected to WiFi");
}

void loop() {
  if ((millis() - lastTime) > timerDelay) {
    if(WiFi.status() == WL_CONNECTED) {
      HTTPClient http;
      String serverPath = serverName + "?temperature=24.37";

      http.begin(serverPath.c_str());
      int httpResponseCode = http.GET();

      if (httpResponseCode > 0) {
        Serial.print("HTTP Response code: ");
        Serial.println(httpResponseCode);
        String payload = http.getString();
        Serial.println("Response: " + payload);
      } else {
        Serial.print("Error code: ");
        Serial.println(httpResponseCode);
      }

      http.end();
    }

    lastTime = millis();
  }
}
3 GET Request with Dynamic Data
In real applications, you'll send dynamic sensor data. Here's how to modify the GET request:
// Add sensor reading function
float readTemperature() {
  // Replace with actual sensor reading code
  return 22.5 + (rand() % 100) / 10.0;
}

// Modified loop() section
void loop() {
  if ((millis() - lastTime) > timerDelay) {
    if(WiFi.status() == WL_CONNECTED) {
      float temperature = readTemperature();
      HTTPClient http;

      // Dynamic query string
      String serverPath = serverName + "?temperature=" + String(temperature);

      http.begin(serverPath.c_str());
      int httpResponseCode = http.GET();

      if (httpResponseCode > 0) {
        Serial.print("Temperature: ");
        Serial.print(temperature);
        Serial.print("°C | HTTP Response: ");
        Serial.println(httpResponseCode);
      }

      http.end();
    }
    lastTime = millis();
  }
}
Implementing ESP32 HTTP POST Requests
4 Basic HTTP POST with URL-encoded Data
HTTP POST requests are essential for sending larger amounts of data. Here's a URL-encoded example:
#include <WiFi.h>
#include <HTTPClient.h>

void loop() {
  if ((millis() - lastTime) > timerDelay) {
    if(WiFi.status() == WL_CONNECTED) {
      HTTPClient http;
      http.begin(serverName.c_str());

      // Specify content-type
      http.addHeader("Content-Type", "application/x-www-form-urlencoded");

      // Prepare POST data
      String httpRequestData = "api_key=your_api_key&sensor=living_room";
      httpRequestData += "&temperature=24.5&humidity=45&pressure=1013";

      // Send HTTP POST request
      int httpResponseCode = http.POST(httpRequestData);

      if (httpResponseCode > 0) {
        Serial.print("HTTP POST Response code: ");
        Serial.println(httpResponseCode);
        String response = http.getString();
        Serial.println("Server response: " + response);
      }

      http.end();
    }
    lastTime = millis();
  }
}
5 POST Request with JSON Data
JSON has become the standard format for API communication. Here's how to send JSON data:
#include <ArduinoJson.h>

void sendJSONData(float temperature, float humidity, float pressure) {
  if(WiFi.status() == WL_CONNECTED) {
    // Create JSON document
    StaticJsonDocument<200> jsonDocument;
    jsonDocument["api_key"] = "your_api_key_here";
    jsonDocument["sensor_name"] = "living_room_sensor";
    jsonDocument["temperature"] = temperature;
    jsonDocument["humidity"] = humidity;
    jsonDocument["pressure"] = pressure;

    // Serialize JSON to string
    String jsonString;
    serializeJson(jsonDocument, jsonString);

    HTTPClient http;
    http.begin(serverName.c_str());

    // Set content-type to JSON
    http.addHeader("Content-Type", "application/json");

    // Send POST request
    int httpResponseCode = http.POST(jsonString);

    if (httpResponseCode > 0) {
      Serial.print("JSON POST Response code: ");
      Serial.println(httpResponseCode);

      String response = http.getString();
      Serial.println("Response: " + response);
    }

    http.end();
  }
}
StaticJsonDocument<size>. The size should be large enough to hold your complete JSON structure.
Integrating with Popular APIs and Services
The principles you've learned apply to virtually any web service. Here are examples for popular platforms:
ThingSpeak API Example
String thingSpeakURL = "http://api.thingspeak.com/update";
String apiKey = "YOUR_CHANNEL_API_KEY";

String postData = "api_key=" + apiKey
                + "&field1=" + String(temperature)
                + "&field2=" + String(humidity);
IFTTT Webhooks Example
String iftttURL = "http://maker.ifttt.com/trigger/event_name/with/key/YOUR_KEY";
String jsonData = "{\"value1\":\"" + String(temperature)
                + "\",\"value2\":\"" + String(humidity)
                + "\",\"value3\":\"" + String(pressure) + "\"}";
Troubleshooting Common Issues
Connection Problems
Wi-Fi Connection Fails: Double-check credentials and ensure ESP32 is within router range.
Server Unreachable: Verify server address, port, and firewall settings.
SSL Certificate Issues: For HTTPS, you may need to handle certificate verification.
Request/Response Problems
Timeout Errors: Increase timeout using http.setTimeout().
Incorrect Data Format: Ensure data matches server expectations.
Memory Issues: Large JSON documents can exhaust memory. Increase buffer size if needed.

Complete IoT Sensor Project Example
Here's a complete project that reads from sensors and sends data to a server:
#include <WiFi.h>
#include <HTTPClient.h>
#include <ArduinoJson.h>
#include "DHT.h"

#define DHTPIN 4
#define DHTTYPE DHT11

DHT dht(DHTPIN, DHTTYPE);

const char* ssid = "YOUR_WIFI";
const char* password = "YOUR_PASSWORD";
String serverURL = "http://your-server.com/api/sensor-data";

unsigned long lastReadingTime = 0;
const long readingInterval = 30000;  // 30 seconds

void setup() {
  Serial.begin(115200);
  dht.begin();
  connectToWiFi();
}

void loop() {
  if (millis() - lastReadingTime >= readingInterval) {
    float temperature = dht.readTemperature();
    float humidity = dht.readHumidity();

    if (!isnan(temperature) && !isnan(humidity)) {
      sendSensorData(temperature, humidity);
    } else {
      Serial.println("Failed to read from DHT sensor");
    }

    lastReadingTime = millis();
  }
}

void sendSensorData(float temp, float humidity) {
  if (WiFi.status() != WL_CONNECTED) {
    connectToWiFi();
    return;
  }

  StaticJsonDocument<256> doc;
  doc["device_id"] = "esp32_01";
  doc["temperature"] = temp;
  doc["humidity"] = humidity;
  doc["timestamp"] = millis();

  String jsonPayload;
  serializeJson(doc, jsonPayload);

  HTTPClient http;
  http.begin(serverURL.c_str());
  http.addHeader("Content-Type", "application/json");

  int httpCode = http.POST(jsonPayload);

  if (httpCode > 0) {
    Serial.printf("Data sent. Response: %d\n", httpCode);
  } else {
    Serial.printf("POST failed, error: %d\n", httpCode);
  }

  http.end();
}
Congratulations! You've mastered HTTP GET and POST requests with the ESP32. These skills open up endless possibilities for IoT projects that interact with web services, APIs, and cloud platforms.