Why This LoRa Sensor Monitoring System Matters for IoT Development
Long-range communication is a critical challenge in many IoT applications, particularly in agriculture, environmental monitoring, remote asset tracking, and smart city implementations. Traditional Wi-Fi networks have limited range, while cellular solutions can be expensive and power-hungry. LoRa technology bridges this gap by offering kilometer-range communication with minimal power consumption.
With this project, you'll learn practical skills that apply to real-world IoT deployments, including how to implement bidirectional communication between nodes, create responsive web interfaces for data visualization, and handle time synchronization using NTP protocols. Whether you're monitoring a greenhouse, tracking weather conditions, or creating a distributed sensor network, this tutorial provides the foundation you need.
Required Components and Parts
To build this complete ESP32 LoRa sensor monitoring system, you'll need the following components:
Essential Components
- TTGO LoRa32 SX1276 OLED boards (2x) - ESP32 development boards with integrated LoRa and OLED
- BME280 sensor module - Temperature, humidity, and pressure sensor
- Breadboard and jumper wires - For circuit connections
- USB cables (Type-C or Micro-USB) - For programming and power
- Computer with Arduino IDE - For programming the ESP32 boards

Understanding LoRa Technology and Frequencies
Before diving into the project, it's helpful to understand what makes LoRa technology unique. LoRa (Long Range) is a spread spectrum modulation technique derived from chirp spread spectrum technology. It enables long-range transmissions with low power consumption, making it ideal for IoT applications.
LoRa operates in license-free frequency bands that vary by region:
- 433MHz - Primarily used in Asia
- 868MHz - Standard frequency for Europe
- 915MHz - Used in North America and Australia
In the project code, you'll need to set the appropriate frequency for your location: #define BAND 866E6 (for Europe).
Key characteristics of LoRa technology:
- Exceptional range: Up to several kilometers in line-of-sight conditions
- Low power consumption: Enabling battery-operated devices to last for years
- Strong signal penetration: Better performance in urban environments compared to other wireless technologies
- High interference immunity: Robust communication even in noisy environments
Common LoRa applications include:
- Agricultural monitoring (soil moisture, weather conditions)
- Smart city infrastructure (parking, lighting, waste management)
- Environmental monitoring (air quality, water levels)
- Asset tracking and logistics
- Industrial IoT and predictive maintenance
Step-by-Step: Setting Up the Development Environment
1 Install Arduino IDE and ESP32 Board Support
To program the TTGO LoRa32 boards, you need to add ESP32 support to the Arduino IDE:
- Open Arduino IDE and go to File > Preferences
- In the "Additional Boards Manager URLs" field, add:
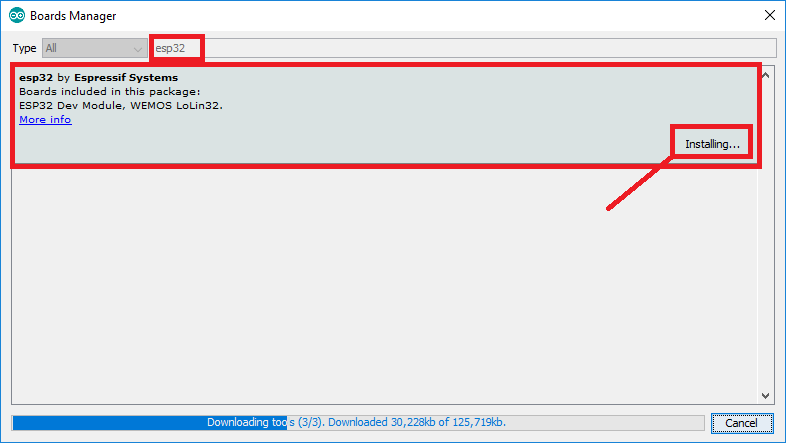
https://raw.githubusercontent.com/espressif/arduino-esp32/gh-pages/package_esp32_index.json - Open Tools > Board > Boards Manager, search for "ESP32", and install the latest version
- Select your specific board: TTGO LoRa32-OLED V1 (or your board variant)
2 Install Required Libraries
This project requires several libraries that can be installed via the Arduino Library Manager:
// Required Libraries for ESP32 LoRa Sensor Project:
1. LoRa library by Sandeep Mistry
2. Adafruit SSD1306 library (for OLED display)
3. Adafruit GFX library (graphics support)
4. Adafruit BME280 library (sensor interface)
5. Adafruit Unified Sensor library
6. ESPAsyncWebServer library
7. AsyncTCP library
8. NTPClient library (Taranais version)
For time synchronization, you'll need to install the NTPClient library by Taranais specifically (not the default version):
- Download the library ZIP file from the provided link
- In Arduino IDE, go to Sketch > Include Library > Add .ZIP Library
- Select the downloaded file to install the library
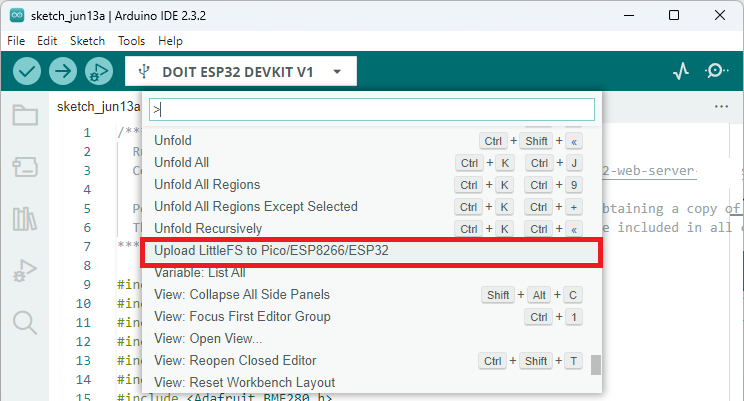
3 Install LittleFS Filesystem Uploader
To upload files to the ESP32 filesystem for the web server, install the ESP32 LittleFS Uploader plugin:
- Download the LittleFS upload tool from GitHub
- Place it in your Arduino IDE tools folder
- Restart Arduino IDE to see the new upload option
Building the LoRa Sender (Transmitter Node)
The LoRa sender consists of a TTGO LoRa32 board connected to a BME280 sensor. The sender reads environmental data and transmits it via LoRa radio every 10 seconds.
4 Circuit Connections for the Sender
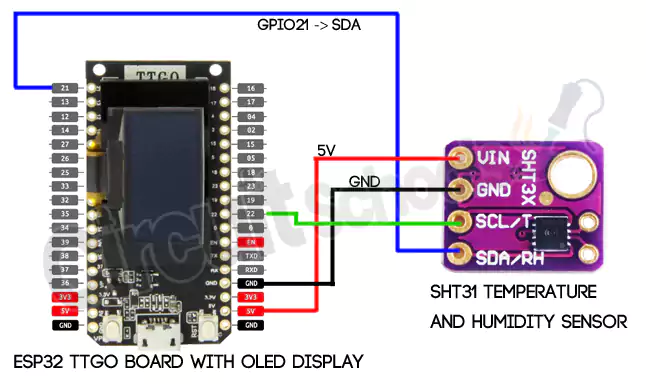
The BME280 uses I2C communication protocol, requiring just four connections:
BME280 to ESP32 Wiring
| BME280 Pin | ESP32 (TTGO) Pin |
|---|---|
| VIN | 3.3V |
| GND | GND |
| SCL | GPIO 13 |
| SDA | GPIO 21 |
5 Understanding the Sender Code Structure
The LoRa sender code performs several key functions:
- Initializing components (OLED, BME280 sensor, LoRa module)
- Reading sensor data from the BME280
- Formatting and transmitting data via LoRa radio
- Displaying status information on the OLED screen
Here's the core structure of the sender code:
// Essential library includes
#include <SPI.h>
#include <LoRa.h>
#include <Wire.h>
#include <Adafruit_GFX.h>
#include <Adafruit_SSD1306.h>
#include <Adafruit_Sensor.h>
#include <Adafruit_BME280.h>

// LoRa module pin definitions for TTGO board
#define SCK 5
#define MISO 19
#define MOSI 27
#define SS 18
#define RST 14
#define DIO0 26

// Frequency band selection (adjust for your region)
#define BAND 866E6  // 868MHz for Europe

void setup() {
  Serial.begin(115200);
  startOLED();    // Initialize OLED display
  startBME();     // Initialize BME280 sensor
  startLoRA();    // Initialize LoRa module
}

void loop() {
  getReadings();   // Read sensor data
  sendReadings();  // Transmit via LoRa
  delay(10000);    // Wait 10 seconds
}
6 Key Functions in the Sender Code
Sensor Reading Function: The getReadings() function retrieves temperature, humidity, and pressure values from the BME280 sensor:
void getReadings(){
  temperature = bme.readTemperature();
  humidity = bme.readHumidity();
  pressure = bme.readPressure() / 100.0F; // Convert to hPa
}
Data Transmission Function: The sendReadings() function packages the sensor data and transmits it via LoRa:
void sendReadings() {
  // Create formatted message string
  LoRaMessage = String(readingID) + "/" + String(temperature) +
                "&" + String(humidity) + "#" + String(pressure);

  // Transmit the packet
  LoRa.beginPacket();
  LoRa.print(LoRaMessage);
  LoRa.endPacket();
}
Building the LoRa Receiver (Web Server Node)
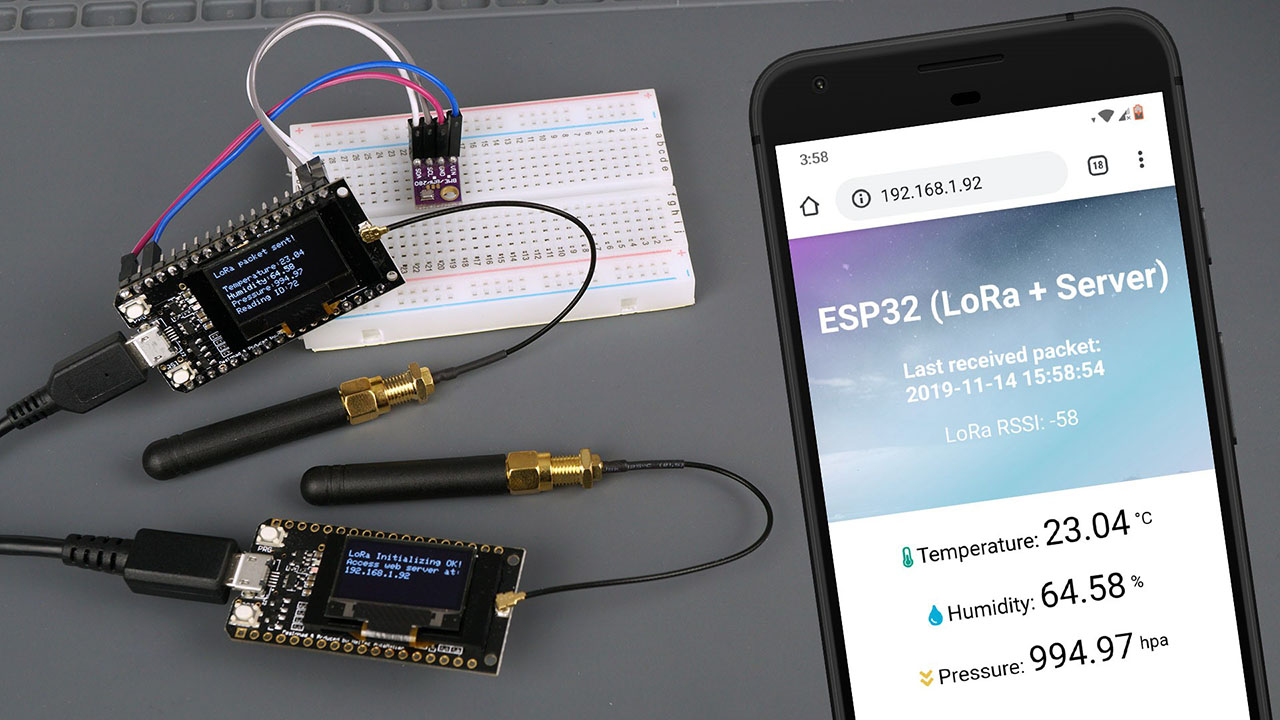
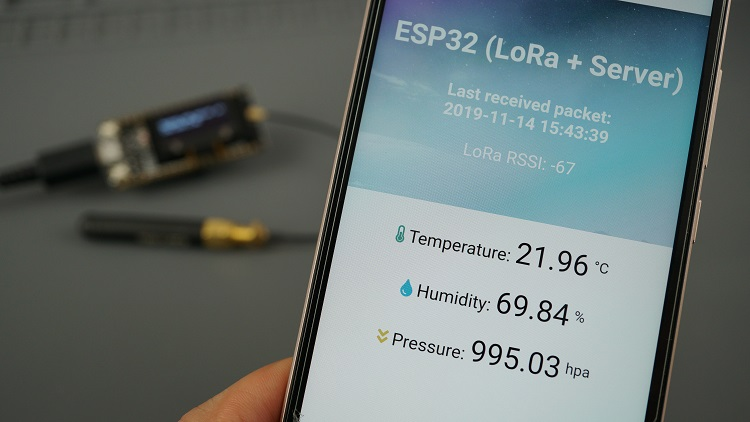
The LoRa receiver gets incoming LoRa packets and displays the received readings on an asynchronous web server. Besides the sensor readings, we also display the last time those readings were received and the RSSI (received signal strength indicator).
7 File Organization for the Web Server
To create the web server interface, you need to organize three main files in a specific structure:
Project File Structure
ESP32_LoRa_Receiver/
├── ESP32_LoRa_Receiver.ino
└── data/
    ├── index.html
    └── background.jpg
The HTML file creates an attractive, responsive interface for displaying sensor data. Key elements include:
- A styled table showing temperature, humidity, and pressure readings
- Timestamp display indicating when readings were last received
- Signal strength indicator (RSSI) showing connection quality
- Background image for visual appeal
- Auto-refresh functionality to update readings automatically
8 Creating the Web Interface HTML
Here's a simplified version of the HTML structure for the web server:
<!DOCTYPE HTML>
<html>
<head>
  <meta name="viewport" content="width=device-width, initial-scale=1">
  <title>ESP32 LoRa Sensor Monitor</title>
  <style>
    /* CSS styles for responsive design */
    body { font-family: Arial; text-align: center; }
    .reading { font-size: 24px; font-weight: bold; }
    .timestamp { color: #666; font-style: italic; }
  </style>
</head>
<body>
  <h1>Environmental Sensor Dashboard</h1>
  <p><strong>Temperature:</strong> %TEMPERATURE% °C</p>
  <p><strong>Humidity:</strong> %HUMIDITY% %</p>
  <p><strong>Pressure:</strong> %PRESSURE% hPa</p>
  <p class="timestamp">Last updated: %TIMESTAMP%</p>
  <p>Signal Strength: %RSSI% dBm</p>
</body>
</html>
9 Uploading Files to ESP32 Filesystem
The HTML and image files need to be uploaded to the ESP32's LittleFS filesystem:
- Create a
datafolder in your sketch directory - Place your HTML and image files in this folder
- Select Tools > ESP32 Sketch Data Upload to transfer files
- The files will now be accessible to your ESP32 program
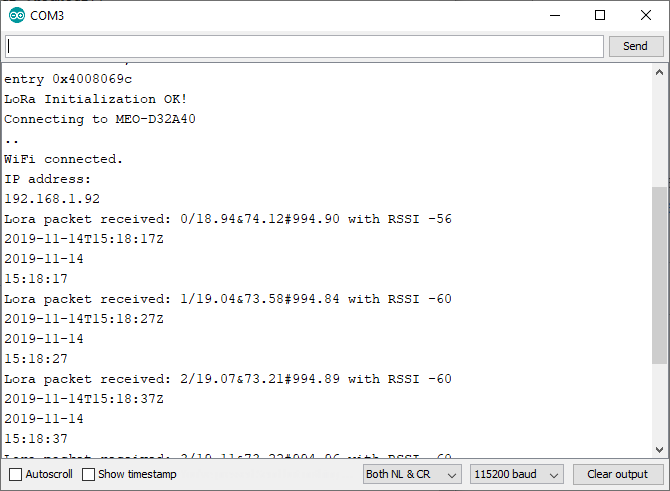
Testing and Troubleshooting the Complete System
10 Testing the LoRa Sender
After uploading the code to your sender board:
- Open the Serial Monitor at 115200 baud rate
- You should see confirmation messages about initialization
- The OLED display should show "LoRa Initialization OK!" followed by sensor readings
- Every 10 seconds, the display should update with "LoRa packet sent!" and current readings
Troubleshooting Common Issues
LoRa Connection Problems
- No packets received: Verify both devices use the same frequency and spreading factor
- Poor signal strength: Check antenna connections and positioning
- Intermittent connections: Reduce distance between nodes or adjust LoRa parameters
Web Server Issues
- Can't connect to web interface: Verify the receiver's IP address and Wi-Fi connection
- Missing images or styling: Ensure files were properly uploaded to LittleFS
- Stale data on web page: Check that the auto-refresh is working in the HTML
Sensor Reading Problems
- Incorrect values: Calibrate the BME280 sensor if readings seem inaccurate
- No sensor data: Verify I2C connections and address (default is 0x76 or 0x77)
Extending and Expanding the Project
This basic implementation can be extended in numerous ways:
The system can easily accommodate additional sensors:
- Soil moisture sensors for agricultural applications
- Air quality sensors for environmental monitoring
- Water level sensors for flood warning systems
- Motion sensors for security applications
- Light sensors for smart lighting systems
Modify the code to enable two-way communication:
- Send commands from the web interface to the remote node
- Implement acknowledgment packets for reliable transmission
- Create configuration interfaces for remote sensor settings
- Add remote control capabilities (relays, actuators)
Enhance the system with data storage capabilities:
- SD card logging for long-term data collection
- Cloud integration with platforms like AWS IoT or ThingsBoard
- Local database storage using SPIFFS or LittleFS
- Time-series visualization with charts and graphs
Conclusion and Next Steps
This ESP32 LoRa sensor monitoring project demonstrates how to create a practical, long-range IoT system using accessible components. By combining LoRa's exceptional range with the ESP32's processing power and Wi-Fi capabilities, you've built a system that can monitor remote locations and present data through a user-friendly web interface.
The skills you've learned—LoRa communication, web server implementation, sensor integration, and filesystem management—form a foundation for countless other IoT projects. Whether you're monitoring environmental conditions, tracking assets, or creating distributed sensor networks, these techniques will serve you well.
Congratulations on building your complete ESP32 LoRa sensor monitoring system with web server! You now have a powerful framework that can be adapted for countless IoT applications requiring long-range communication combined with accessible web-based monitoring.
Complete Arduino Code for ESP32 LoRa Sensor System
A Complete LoRa Sender Code
Here's the complete Arduino code for the LoRa sender:
//Libraries for LoRa
#include <SPI.h>
#include <LoRa.h>

//Libraries for OLED Display
#include <Wire.h>
#include <Adafruit_GFX.h>
#include <Adafruit_SSD1306.h>

//Libraries for BME280
#include <Adafruit_Sensor.h>
#include <Adafruit_BME280.h>

//define the pins used by the LoRa transceiver module
#define SCK 5
#define MISO 19
#define MOSI 27
#define SS 18
#define RST 14
#define DIO0 26

//433E6 for Asia
//866E6 for Europe
//915E6 for North America
#define BAND 866E6

//OLED pins
#define OLED_SDA 4
#define OLED_SCL 15
#define OLED_RST 16
#define SCREEN_WIDTH 128 // OLED display width, in pixels
#define SCREEN_HEIGHT 64 // OLED display height, in pixels

//BME280 definition
#define SDA 21
#define SCL 13

TwoWire I2Cone = TwoWire(1);
Adafruit_BME280 bme;

//packet counter
int readingID = 0;

int counter = 0;
String LoRaMessage = "";

float temperature = 0;
float humidity = 0;
float pressure = 0;

Adafruit_SSD1306 display(SCREEN_WIDTH, SCREEN_HEIGHT, &Wire, OLED_RST);

//Initialize OLED display
void startOLED(){
  //reset OLED display via software
  pinMode(OLED_RST, OUTPUT);
  digitalWrite(OLED_RST, LOW);
  delay(20);
  digitalWrite(OLED_RST, HIGH);

  //initialize OLED
  Wire.begin(OLED_SDA, OLED_SCL);
  if(!display.begin(SSD1306_SWITCHCAPVCC, 0x3c, false, false)) {
    Serial.println(F("SSD1306 allocation failed"));
    for(;;); // Don't proceed, loop forever
  }
  display.clearDisplay();
  display.setTextColor(WHITE);
  display.setTextSize(1);
  display.setCursor(0,0);
  display.print("LORA SENDER");
}

//Initialize LoRa module
void startLoRA(){
  //SPI LoRa pins
  SPI.begin(SCK, MISO, MOSI, SS);
  //setup LoRa transceiver module
  LoRa.setPins(SS, RST, DIO0);

  while (!LoRa.begin(BAND) && counter < 10) {
    Serial.print(".");
    counter++;
    delay(500);
  }
  if (counter == 10) {
    // Increment readingID on every new reading
    readingID++;
    Serial.println("Starting LoRa failed!");
  }
  Serial.println("LoRa Initialization OK!");
  display.setCursor(0,10);
  display.clearDisplay();
  display.print("LoRa Initializing OK!");
  display.display();
  delay(2000);
}

void startBME(){
  I2Cone.begin(SDA, SCL, 100000);
  bool status1 = bme.begin(0x76, &I2Cone);
  if (!status1) {
    Serial.println("Could not find a valid BME280_1 sensor, check wiring!");
    while (1);
  }
}

void getReadings(){
  temperature = bme.readTemperature();
  humidity = bme.readHumidity();
  pressure = bme.readPressure() / 100.0F;
}

void sendReadings() {
  LoRaMessage = String(readingID) + "/" + String(temperature) + "&" + String(humidity) + "#" + String(pressure);
  //Send LoRa packet to receiver
  LoRa.beginPacket();
  LoRa.print(LoRaMessage);
  LoRa.endPacket();

  display.clearDisplay();
  display.setCursor(0,0);
  display.setTextSize(1);
  display.print("LoRa packet sent!");
  display.setCursor(0,20);
  display.print("Temperature:");
  display.setCursor(72,20);
  display.print(temperature);
  display.setCursor(0,30);
  display.print("Humidity:");
  display.setCursor(54,30);
  display.print(humidity);
  display.setCursor(0,40);
  display.print("Pressure:");
  display.setCursor(54,40);
  display.print(pressure);
  display.setCursor(0,50);
  display.print("Reading ID:");
  display.setCursor(66,50);
  display.print(readingID);
  display.display();
  Serial.print("Sending packet: ");
  Serial.println(readingID);
  readingID++;
}

void setup() {
  //initialize Serial Monitor
  Serial.begin(115200);
  startOLED();
  startBME();
  startLoRA();
}
void loop() {
  getReadings();
  sendReadings();
  delay(10000);
}
B Complete LoRa Receiver Code
Here's the complete Arduino code for the LoRa receiver with web server:
/*********
  Complete project details at https://RandomNerdTutorials.com/esp32-lora-sensor-web-server/
*********/

#include <SPI.h>
#include <LoRa.h>
#include <WiFi.h>
#include <WebServer.h>
#include <FS.h>
#include <LittleFS.h>
#include <NTPClient.h>
#include <WiFiUdp.h>

// LoRa pins for TTGO board
#define SCK 5
#define MISO 19
#define MOSI 27
#define SS 18
#define RST 14
#define DIO0 26

// LoRa frequency - change for your region
#define BAND 866E6

// WiFi credentials
const char* ssid = "YOUR_WIFI_SSID";
const char* password = "YOUR_WIFI_PASSWORD";

// Web server on port 80
WebServer server(80);

// NTP Client for time
WiFiUDP ntpUDP;
NTPClient timeClient(ntpUDP, "pool.ntp.org");

// Variables to hold sensor data
float temperature = 0;
float humidity = 0;
float pressure = 0;
String timestamp = "";
int rssi = 0;
int packetCount = 0;

void setup() {
  Serial.begin(115200);

  // Initialize LoRa
  SPI.begin(SCK, MISO, MOSI, SS);
  LoRa.setPins(SS, RST, DIO0);

  if (!LoRa.begin(BAND)) {
    Serial.println("Starting LoRa failed!");
    while (1);
  }
  Serial.println("LoRa Receiver Initialized!");

  // Connect to WiFi
  WiFi.begin(ssid, password);
  Serial.print("Connecting to WiFi");
  while (WiFi.status() != WL_CONNECTED) {
    delay(500);
    Serial.print(".");
  }
  Serial.println();
  Serial.print("Connected to: ");
  Serial.println(ssid);
  Serial.print("IP address: ");
  Serial.println(WiFi.localIP());

  // Initialize LittleFS
  if (!LittleFS.begin()) {
    Serial.println("LittleFS Mount Failed");
    return;
  }

  // Initialize NTP client
  timeClient.begin();
  timeClient.setTimeOffset(0); // Adjust for your timezone

  // Set up web server routes
  server.on("/", handleRoot);
  server.on("/readings", handleReadings);
  server.on("/style.css", handleCSS);
  server.on("/background.jpg", handleImage);

  server.begin();
  Serial.println("HTTP server started");

  // Start listening for LoRa packets
  LoRa.receive();
}

void loop() {
  server.handleClient();

  // Check for incoming LoRa packets
  int packetSize = LoRa.parsePacket();
  if (packetSize) {
    processLoRaPacket();
  }

  // Update NTP time periodically
  static unsigned long lastTimeUpdate = 0;
  if (millis() - lastTimeUpdate > 60000) { // Update every minute
    timeClient.update();
    lastTimeUpdate = millis();
  }
}

void processLoRaPacket() {
  String packet = "";
  while (LoRa.available()) {
    packet += (char)LoRa.read();
  }

  // Parse the formatted string: ID/TEMP&HUMIDITY#PRESSURE
  int separator1 = packet.indexOf('/');
  int separator2 = packet.indexOf('&');
  int separator3 = packet.indexOf('#');

  if (separator1 > 0 && separator2 > 0 && separator3 > 0) {
    packetCount = packet.substring(0, separator1).toInt();
    temperature = packet.substring(separator1 + 1, separator2).toFloat();
    humidity = packet.substring(separator2 + 1, separator3).toFloat();
    pressure = packet.substring(separator3 + 1).toFloat();

    rssi = LoRa.packetRssi();

    // Update timestamp
    timeClient.update();
    timestamp = timeClient.getFormattedTime();

    Serial.print("Received packet ");
    Serial.print(packetCount);
    Serial.print(": ");
    Serial.print(temperature);
    Serial.print("°C, ");
    Serial.print(humidity);
    Serial.print("%, ");
    Serial.print(pressure);
    Serial.println(" hPa");
  }
}

void handleRoot() {
  File file = LittleFS.open("/index.html", "r");
  if (!file) {
    server.send(500, "text/plain", "Error loading HTML file");
    return;
  }

  String html = file.readString();
  file.close();

  // Replace placeholders with actual values
  html.replace("%TEMPERATURE%", String(temperature));
  html.replace("%HUMIDITY%", String(humidity));
  html.replace("%PRESSURE%", String(pressure));
  html.replace("%TIMESTAMP%", timestamp);
  html.replace("%RSSI%", String(rssi));
  html.replace("%PACKETCOUNT%", String(packetCount));

  server.send(200, "text/html", html);
}

void handleReadings() {
  String json = "{";
  json += "\"temperature\":" + String(temperature) + ",";
  json += "\"humidity\":" + String(humidity) + ",";
  json += "\"pressure\":" + String(pressure) + ",";
  json += "\"timestamp\":\"" + timestamp + "\",";
  json += "\"rssi\":" + String(rssi) + ",";
  json += "\"packetCount\":" + String(packetCount);
  json += "}";

  server.send(200, "application/json", json);
}

void handleCSS() {
  File file = LittleFS.open("/style.css", "r");
  if (!file) {
    server.send(404, "text/plain", "CSS file not found");
    return;
  }
  server.streamFile(file, "text/css");
  file.close();
}

void handleImage() {
  File file = LittleFS.open("/background.jpg", "r");
  if (!file) {
    server.send(404, "text/plain", "Image file not found");
    return;
  }
  server.streamFile(file, "image/jpeg");
  file.close();
}