Introduction to ESP32 with Arduino IDE
The ESP32 is a powerful microcontroller with built-in Wi-Fi and Bluetooth capabilities, making it ideal for IoT projects and connected applications. While there are several programming environments available for the ESP32, many makers prefer using the familiar Arduino IDE due to its simplicity and extensive library support.
With a simple add-on, you can program the ESP32 using the same Arduino programming language you already know. In this comprehensive guide, I'll walk you through installing the ESP32 board in your Arduino IDE whether you're using Windows, Mac OS X, or Linux.
Before You Begin: Prerequisites
Install Arduino IDE First
Before starting the ESP32 installation procedure, you need to have Arduino IDE already installed on your computer. There are two versions available: the legacy version 1.x and the newer Arduino IDE 2.0.
You can download and install the Arduino IDE from the official website: arduino.cc/en/Main/Software
Arduino IDE 1.8.x
- Recommended for most users
- Full plugin support including SPIFFS Filesystem Uploader
- More stable for ESP32 development
- Wider compatibility with existing tutorials
Arduino IDE 2.0
- Modern interface with improved features
- Some ESP32 plugins not yet fully supported
- Requires slightly different installation process
- Good for those wanting the latest IDE features
Step-by-Step: Installing the ESP32 Add-on in Arduino IDE
Follow these instructions carefully to add ESP32 support to your Arduino IDE:
1 Add the ESP32 Board Manager URL
- Open your Arduino IDE
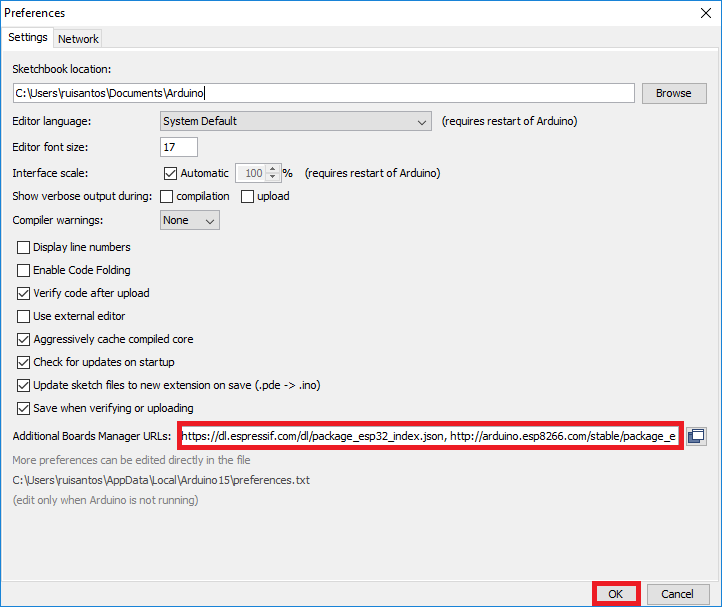
- Go to File > Preferences (Windows/Linux) or Arduino > Preferences (Mac)
- Look for the field labeled "Additional Board Manager URLs"
- Click the small button next to the field
- In the window that appears, add the following URL:
https://raw.githubusercontent.com/espressif/arduino-esp32/gh-pages/package_esp32_index.json - Click "OK" to save your preferences
https://raw.githubusercontent.com/espressif/arduino-esp32/gh-pages/package_esp32_index.json, http://arduino.esp8266.com/stable/package_esp8266com_index.json
2 Install ESP32 Boards via Board Manager
- Open the Boards Manager by navigating to Tools > Board > Boards Manager...
- In the search bar, type "ESP32"
- Look for the entry labeled "ESP32 by Espressif Systems"
- Click the "Install" button next to it
The installation process will begin, downloading and setting up all necessary files. This might take a few minutes depending on your internet connection speed. You'll see a progress bar indicating the installation status.
- Once completed, you should see "INSTALLED" next to the ESP32 entry
- Close the Boards Manager window
That's it! The ESP32 board support is now installed in your Arduino IDE.
Testing Your ESP32 Installation
Now let's verify that everything is working correctly with a simple test sketch.
3 Connect and Configure Your ESP32 Board
- Connect your ESP32 board to your computer using a USB cable
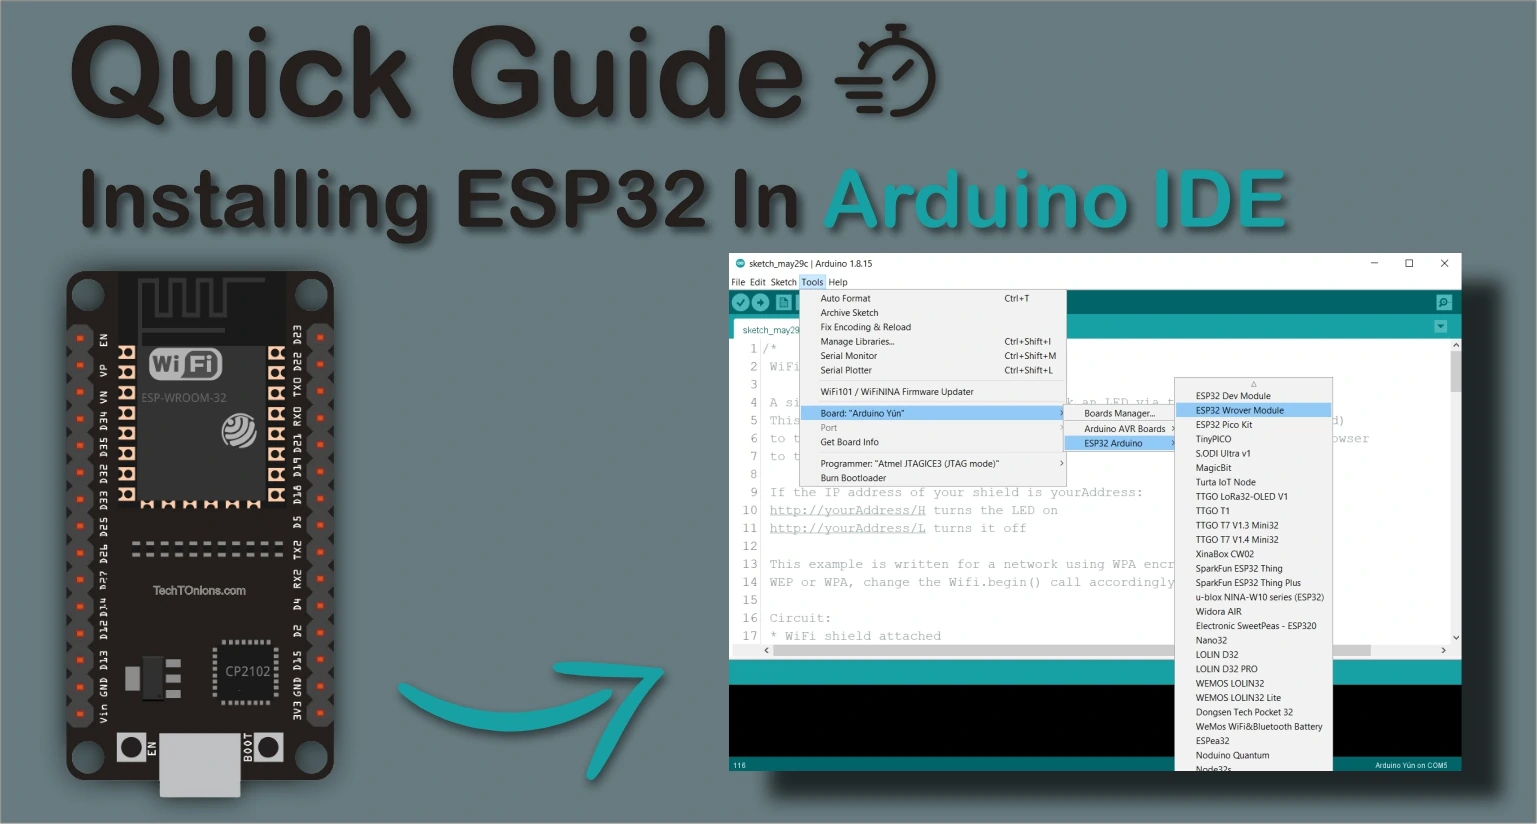
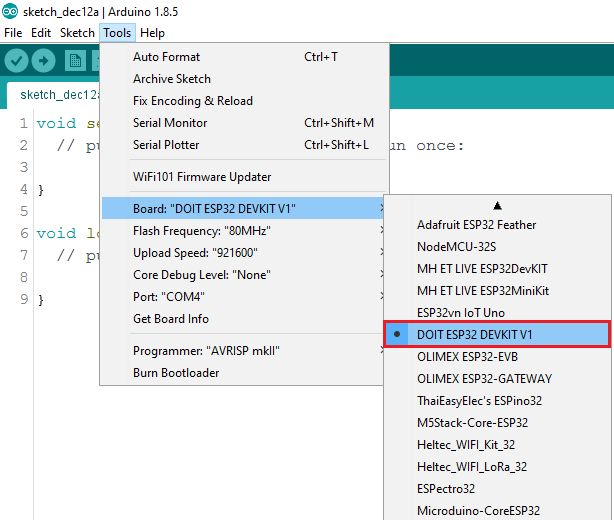
- In Arduino IDE, go to Tools > Board
- Scroll through the list and select your specific ESP32 board. If you're not sure which one you have, start with "ESP32 Dev Module" or "DOIT ESP32 DEVKIT V1"
- Next, select the correct serial port:
- Go to Tools > Port
- Select the port that corresponds to your ESP32 board
- On Windows: COMx (where x is a number)
- On Mac: "/dev/cu.usbserial-xxxx"
- On Linux: "/dev/ttyUSBx"
4 Upload a Test Sketch
- Open an example sketch by going to File > Examples > WiFi (ESP32) > WiFiScan
- This will open a new window with the WiFiScan example code
- Click the Upload button (right arrow icon) in the Arduino IDE toolbar
- Wait while the code compiles and uploads to your board
You should see progress messages in the bottom panel of the Arduino IDE. The compilation might take longer than with standard Arduino boards since it's preparing the ESP32-specific code.
- If everything works correctly, you'll see a "Done uploading" message
5 View the Results
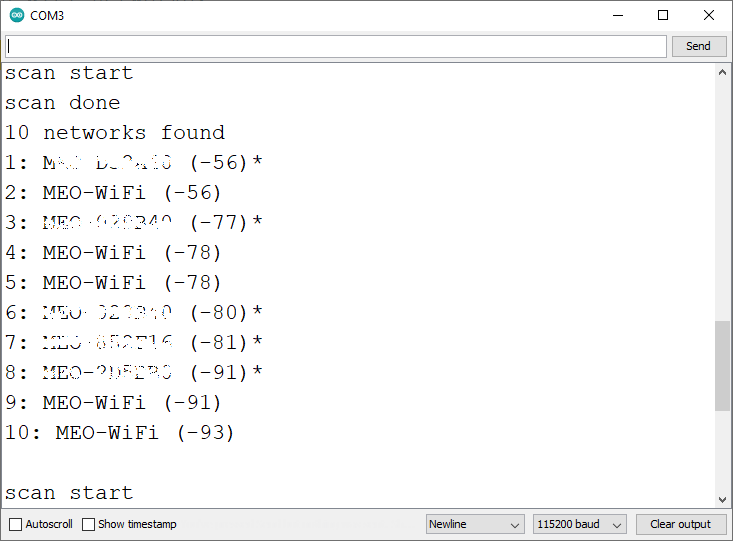
- After uploading, open the Serial Monitor by going to Tools > Serial Monitor or clicking the magnifying glass icon
- Set the baud rate to 115200 (bottom right of Serial Monitor window)
- Press the ENABLE button (sometimes labeled RST or RESET) on your ESP32 board
- You should see the ESP32 scanning for and listing available Wi-Fi networks in your area
Troubleshooting Common Issues
Even with careful installation, you might encounter some issues. Here are solutions to the most common problems:
Issue 1: Upload Timeout Error
"A fatal error occurred: Failed to connect to ESP32: Timed out... Connecting..."
This usually means your ESP32 isn't in the correct flashing/uploading mode.
Solution: Manual upload mode
- Make sure you have the correct board and COM port selected
- Hold down the BOOT button on your ESP32 board
- While holding BOOT, click the Upload button in Arduino IDE
- When you see "Connecting..." in the Arduino IDE output, release the BOOT button
- The upload should proceed normally
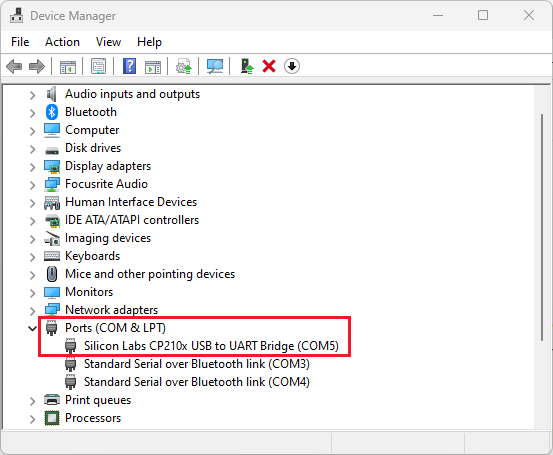
Issue 2: COM Port Not Found
If your ESP32 doesn't appear in the Port menu or you get a "COM Port not found" error:
Solution: Install the correct drivers
Most ESP32 boards use one of these common USB-to-serial chips:
You can usually identify which chip your board uses by looking at the square chip near the USB port. Visit the manufacturer's website or search for the specific drivers for your operating system.
What's Next With Your ESP32?
Now that you have the ESP32 working with Arduino IDE, the possibilities are endless! Here are some project ideas to get you started:
Beginner Projects
- Wi-Fi enabled LED control
- Sensor data logger
- Simple web server
Intermediate Projects
- IoT home automation
- Bluetooth classic devices
- Data visualization dashboards
Advanced Projects
- Dual-core applications
- Low-power sensor networks
- Voice control integration
Conclusion
Successfully installing the ESP32 board in Arduino IDE opens up a world of possibilities for your microcontroller projects. With Wi-Fi and Bluetooth capabilities, dual-core processing, and ample memory, the ESP32 is a versatile platform that bridges the gap between simple Arduino projects and more complex IoT applications.
Remember that while you might encounter some hurdles during installation, the ESP32 community is large and supportive. Most issues have been encountered and solved by others before you.
If you experience persistent problems not covered in this guide, I recommend checking out the comprehensive ESP32 Troubleshooting Guide available on our website, which covers dozens of specific issues and their solutions.
Happy coding with your ESP32! Whether you're building smart home devices, environmental sensors, or innovative IoT solutions, you now have the foundation to bring your ideas to life.