Introduction to ESP32 WebSocket Communication
In this comprehensive tutorial, you'll learn how to create an ESP32 web server using the WebSocket communication protocol. We'll build a practical web interface that lets you remotely control your ESP32's outputs, with all connected clients receiving automatic updates when changes occur. This approach solves a common problem in traditional web server projects where multiple browser tabs or devices don't synchronize their displayed state without manual refreshing.

If you've worked with ESP32 web servers before, you've likely encountered situations where opening multiple tabs or using several devices simultaneously causes display inconsistencies. Each client shows different state information until you refresh the page. WebSocket protocol elegantly solves this issue by maintaining persistent connections that allow instant bidirectional communication between server and clients.
Understanding WebSocket Technology
A WebSocket establishes a persistent, two-way communication channel between a client (like your web browser) and a server (your ESP32). Unlike traditional HTTP requests that follow a request-response pattern and then close the connection, WebSocket maintains an open TCP connection that allows either party to send data at any time.
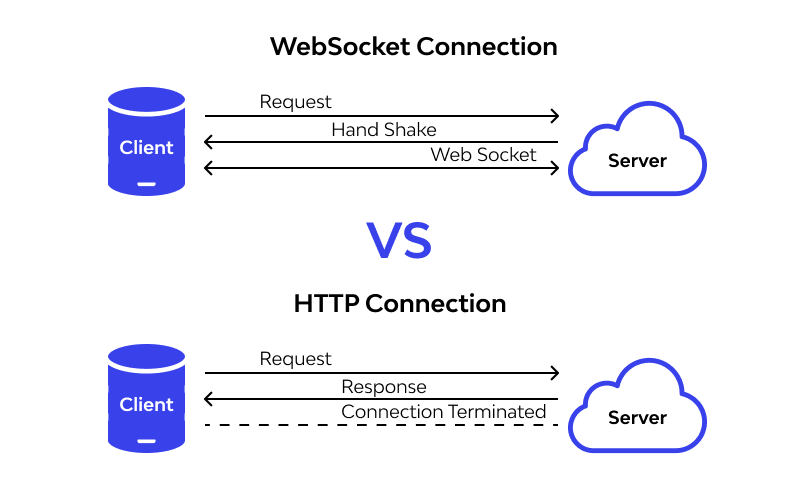
The connection begins with a WebSocket handshake—an HTTP request/response sequence that upgrades the connection protocol. This clever approach allows servers to handle both standard HTTP and WebSocket connections on the same port (typically port 80). Once established, the connection operates in full-duplex mode, meaning both server and client can send and receive data simultaneously.
For ESP32 IoT projects, this means your board can proactively send updates to connected web browsers without waiting for a request. Whether someone clicks a button on your web interface or you press a physical button connected to the ESP32, all connected clients receive the updated information instantly.
Project Overview and Functionality
Let's examine what we'll create in this project:
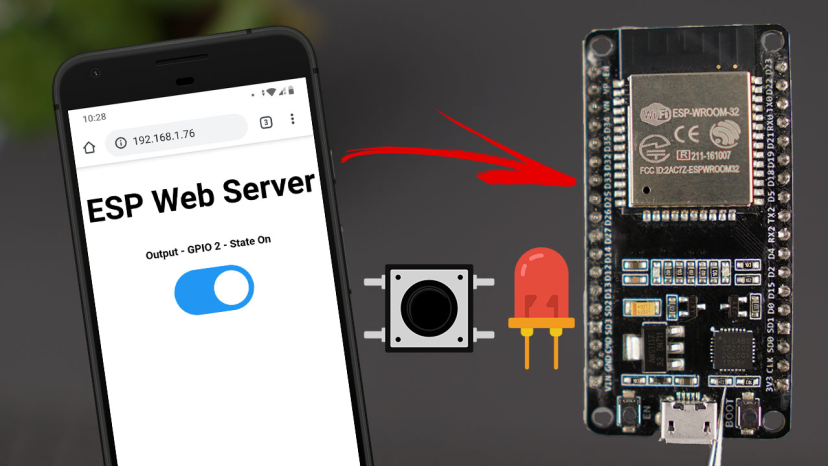
- Real-time Web Server: An ESP32 web server hosting a clean web interface with a toggle button controlling GPIO 2
- Synchronized State Display: Real-time display of the current GPIO state on the web page
- Multi-Client Support: Automatic synchronization across all connected clients (multiple tabs or devices)
- Expandable Foundation: For simplicity, we're controlling the built-in LED connected to GPIO 2, but you can easily adapt this to control any GPIO pin
The interface elegantly shows the current GPIO state, and any changes to this state update immediately across all connected web interfaces. This means if you have three browser tabs open on your laptop and two smartphones connected simultaneously, all five interfaces will show identical, synchronized information at all times.
How the WebSocket Communication Works
1 User Action
You click the "Toggle" button on the web page. This action initiates the WebSocket communication sequence.
2 Client Transmission
Your browser sends a "toggle" message via the WebSocket connection to the ESP32 server. This message is lightweight and instantly transmitted.
3 Server Processing
The ESP32 receives this message and toggles the LED state (OFF→ON or ON→OFF). The server logic processes the command and updates its internal state.
4 Broadcast Update
The ESP32 sends the new LED state to ALL connected clients also through WebSocket protocol. This broadcast ensures everyone sees the same state.
5 Client Update
Each connected browser receives the message and updates the LED state on the web page accordingly. This allows us to update all clients almost instantaneously when a change happens.
Preparing Your Development Environment
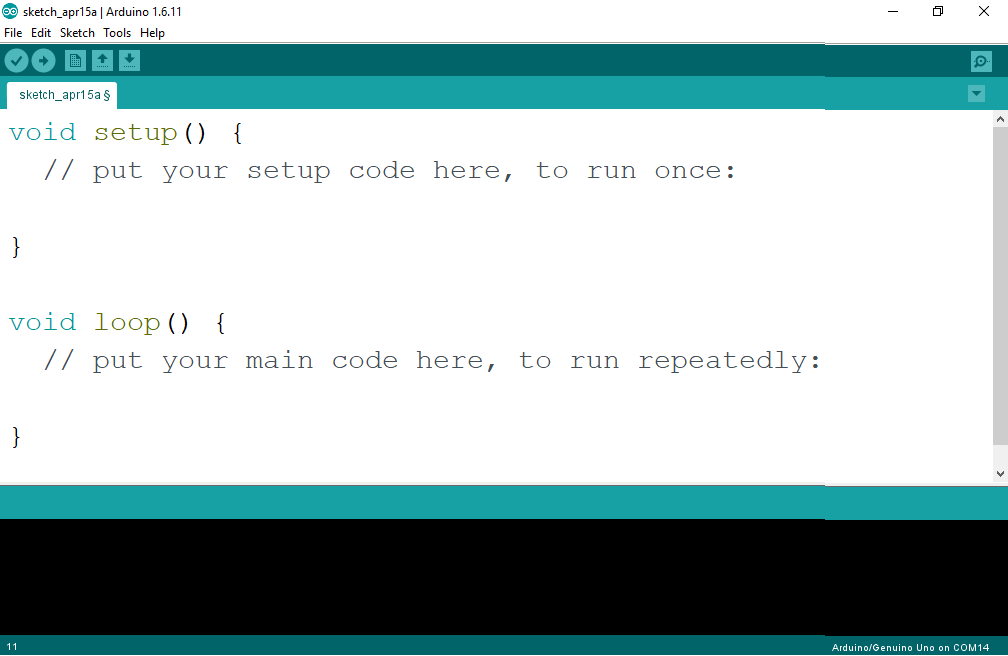
Before we dive into the code, we need to set up our development environment properly. We'll program the ESP32 using Arduino IDE, so ensure you have it installed with ESP32 board support configured.
Required Components
- ESP32 development board (any model with Wi-Fi)
- USB cable for programming and power
- Computer with Arduino IDE installed
- Wi-Fi network for ESP32 connection
- Web browser for testing (Chrome, Firefox, or Edge recommended)
Installing Required Libraries
Our project relies on two essential libraries that make WebSocket implementation straightforward:
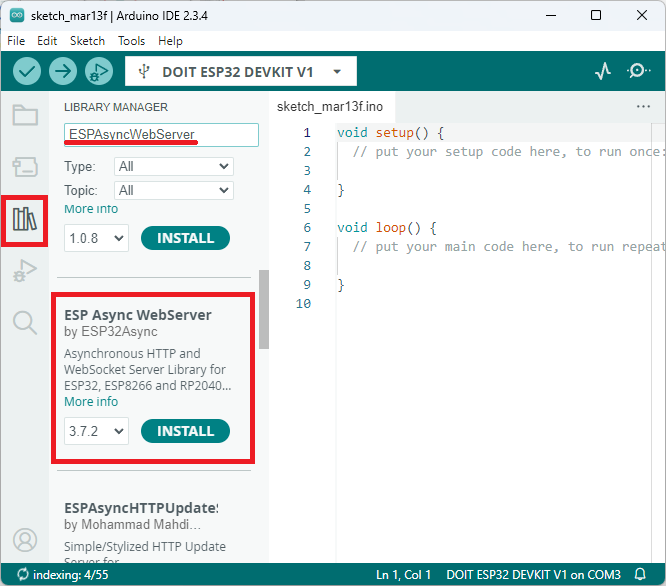
- ESPAsyncWebServer by ESP32Async
- AsyncTCP by ESP32Async
Install these through the Arduino Library Manager:
1 Open Library Manager
Click the Library icon in the left sidebar (or navigate to Sketch → Include Library → Manage Libraries).
2 Install ESPAsyncWebServer
Search for "ESPAsyncWebServer" and install the version by "ESP32Async".
3 Install AsyncTCP
Search for "AsyncTCP" and install the version by "ESP32Async".
Complete ESP32 WebSocket Server Code
Here's the complete code for our ESP32 WebSocket server. Copy this into your Arduino IDE, and we'll break down how it works section by section:
                    // Import required libraries
                    #include <WiFi.h>
                    #include <AsyncTCP.h>
                    #include <ESPAsyncWebServer.h>

                    // Replace with your network credentials
                    const char* ssid = "REPLACE_WITH_YOUR_SSID";
                    const char* password = "REPLACE_WITH_YOUR_PASSWORD";

                    bool ledState = 0;
                    const int ledPin = 2;

                    // Create AsyncWebServer object on port 80
                    AsyncWebServer server(80);
                    AsyncWebSocket ws("/ws");

                    const char index_html[] PROGMEM = R"rawliteral(
                    <!DOCTYPE HTML><html>
                    <head>
                    <title>ESP Web Server</title>
                    <meta name="viewport" content="width=device-width, initial-scale=1">
                    <link rel="icon" href="data:,">
                    <style>
                    html {
                        font-family: Arial, Helvetica, sans-serif;
                        text-align: center;
                    }
                    h1 {
                        font-size: 1.8rem;
                        color: white;
                    }
                    h2{
                        font-size: 1.5rem;
                        font-weight: bold;
                        color: #143642;
                    }
                    .topnav {
                        overflow: hidden;
                        background-color: #143642;
                    }
                    body {
                        margin: 0;
                    }
                    .content {
                        padding: 30px;
                        max-width: 600px;
                        margin: 0 auto;
                    }
                    .card {
                        background-color: #F8F7F9;;
                        box-shadow: 2px 2px 12px 1px rgba(140,140,140,.5);
                        padding-top:10px;
                        padding-bottom:20px;
                    }
                    .button {
                        padding: 15px 50px;
                        font-size: 24px;
                        text-align: center;
                        outline: none;
                        color: #fff;
                        background-color: #0f8b8d;
                        border: none;
                        border-radius: 5px;
                        -webkit-touch-callout: none;
                        -webkit-user-select: none;
                        -khtml-user-select: none;
                        -moz-user-select: none;
                        -ms-user-select: none;
                        user-select: none;
                        -webkit-tap-highlight-color: rgba(0,0,0,0);
                    }
                    .button:active {
                        background-color: #0f8b8d;
                        box-shadow: 2 2px #CDCDCD;
                        transform: translateY(2px);
                    }
                    .state {
                        font-size: 1.5rem;
                        color:#8c8c8c;
                        font-weight: bold;
                    }
                    </style>
                    <title>ESP Web Server</title>
                    <meta name="viewport" content="width=device-width, initial-scale=1">
                    <link rel="icon" href="data:,">
                    </head>
                    <body>
                    <div class="topnav">
                        <h1>ESP WebSocket Server</h1>
                    </div>
                    <div class="content">
                        <div class="card">
                        <h2>Output - GPIO 2</h2>
                        <p class="state">state: <span id="state">%STATE%</span></p>
                        <p><button id="button" class="button">Toggle</button></p>
                        </div>
                    </div>
                    <script>
                    var gateway = `ws://${window.location.hostname}/ws`;
                    var websocket;
                    window.addEventListener('load', onLoad);
                    function initWebSocket() {
                        console.log('Trying to open a WebSocket connection...');
                        websocket = new WebSocket(gateway);
                        websocket.onopen    = onOpen;
                        websocket.onclose   = onClose;
                        websocket.onmessage = onMessage;
                    }
                    function onOpen(event) {
                        console.log('Connection opened');
                    }
                    function onClose(event) {
                        console.log('Connection closed');
                        setTimeout(initWebSocket, 2000);
                    }
                    function onMessage(event) {
                        var state;
                        if (event.data == "1"){
                        state = "ON";
                        }
                        else{
                        state = "OFF";
                        }
                        document.getElementById('state').innerHTML = state;
                    }
                    function onLoad(event) {
                        initWebSocket();
                        initButton();
                    }
                    function initButton() {
                        document.getElementById('button').addEventListener('click', toggle);
                    }
                    function toggle(){
                        websocket.send('toggle');
                    }
                    </script>
                    </body>
                    </html>
                    )rawliteral";

                    void notifyClients() {
                    ws.textAll(String(ledState));
                    }

                    void handleWebSocketMessage(void *arg, uint8_t *data, size_t len) {
                    AwsFrameInfo *info = (AwsFrameInfo*)arg;
                    if (info->final && info->index == 0 && info->len == len && info->opcode == WS_TEXT) {
                        data[len] = 0;
                        if (strcmp((char*)data, "toggle") == 0) {
                        ledState = !ledState;
                        notifyClients();
                        }
                    }
                    }

                    void onEvent(AsyncWebSocket *server, AsyncWebSocketClient *client, AwsEventType type,
                                void *arg, uint8_t *data, size_t len) {
                    switch (type) {
                        case WS_EVT_CONNECT:
                        Serial.printf("WebSocket client #%u connected from %s\n", client->id(), client->remoteIP().toString().c_str());
                        break;
                        case WS_EVT_DISCONNECT:
                        Serial.printf("WebSocket client #%u disconnected\n", client->id());
                        break;
                        case WS_EVT_DATA:
                        handleWebSocketMessage(arg, data, len);
                        break;
                        case WS_EVT_PONG:
                        case WS_EVT_ERROR:
                        break;
                    }
                    }

                    void initWebSocket() {
                    ws.onEvent(onEvent);
                    server.addHandler(&ws);
                    }

                    String processor(const String& var){
                    Serial.println(var);
                    if(var == "STATE"){
                        if (ledState){
                        return "ON";
                        }
                        else{
                        return "OFF";
                        }
                    }
                    return String();
                    }

                    void setup(){
                    // Serial port for debugging purposes
                    Serial.begin(115200);

                    pinMode(ledPin, OUTPUT);
                    digitalWrite(ledPin, LOW);

                    // Connect to Wi-Fi
                    WiFi.begin(ssid, password);
                    while (WiFi.status() != WL_CONNECTED) {
                        delay(1000);
                        Serial.println("Connecting to WiFi..");
                    }

                    // Print ESP Local IP Address
                    Serial.println(WiFi.localIP());

                    initWebSocket();

                    // Route for root / web page
                    server.on("/", HTTP_GET, [](AsyncWebServerRequest *request){
                        request->send(200, "text/html", index_html, processor);
                    });

                    // Start server
                    server.begin();
                    }

                    void loop() {
                    ws.cleanupClients();
                    digitalWrite(ledPin, ledState);
                    }
const char* ssid = "REPLACE_WITH_YOUR_SSID";
const char* password = "REPLACE_WITH_YOUR_PASSWORD";
Code Explanation and Breakdown
Now let's examine how this code works in detail, section by section:
Library Imports and Network Configuration
We begin by importing necessary libraries. The WiFi.h provides ESP32 Wi-Fi functionality, while AsyncTCP.h and ESPAsyncWebServer.h give us the asynchronous web server capabilities with WebSocket support.
#include <WiFi.h>
#include <AsyncTCP.h>
#include <ESPAsyncWebServer.h>
The network credentials section is where you personalize the code for your environment. Make sure to use your actual Wi-Fi network name and password.
GPIO Configuration and Server Objects
We define variables to track the LED state and which pin we're controlling:
bool ledState = 0;          // Tracks current LED state (0=OFF, 1=ON)
const int ledPin = 2;       // GPIO 2, which controls the built-in LED
Next, we create the web server and WebSocket objects:
AsyncWebServer server(80);  // HTTP server on port 80
AsyncWebSocket ws("/ws");   // WebSocket endpoint at /ws path
The server handles regular HTTP requests, while the WebSocket object manages the persistent connections for real-time communication.
HTML, CSS, and JavaScript Interface
The index_html variable contains our complete web interface. Let's examine its key components:
1 HTML Structure
The page has a clean, responsive design with:
- A navigation header showing "ESP WebSocket Server"
- A content card displaying the GPIO 2 output status
- A toggle button for changing the LED state
2 CSS Styling
We've included attractive styling that creates a modern card-based interface with:
- Responsive design that works on mobile and desktop
- Visual feedback for button presses
- Clear typography and color coding
3 JavaScript WebSocket Implementation
The script section handles all client-side WebSocket operations:
var gateway = `ws://${window.location.hostname}/ws`;
var websocket;
This JavaScript establishes the WebSocket connection to the ESP32, defines event handlers for connection events, and manages the button click interactions. The onMessage function processes incoming WebSocket messages to update the displayed state.
WebSocket Event Handling on ESP32
The C++ code includes several crucial functions for WebSocket management:
initWebSocket(): Registers our event handler with the WebSocket objectonEvent(): Handles connection, disconnection, and data eventshandleWebSocketMessage(): Processes incoming WebSocket messages
When a "toggle" message arrives from any client, this function flips the ledState variable and calls notifyClients() to broadcast the change to all connected devices.
void notifyClients() {
  ws.textAll(String(ledState));
}
This simple but powerful function sends the current LED state to every connected WebSocket client, ensuring perfect synchronization.
Template Processing Function
The processor() function replaces placeholders in our HTML template with dynamic values:
String processor(const String& var){
  if(var == "STATE"){
    return ledState ? "ON" : "OFF";
  }
  return String();
}
When a client first loads the web page, the %STATE% placeholder in the HTML gets replaced with either "ON" or "OFF" based on the current LED state.
Setup and Loop Functions
The setup() function initializes all components:
- Starts serial communication for debugging
- Configures the LED pin as an output
- Connects to Wi-Fi
- Initializes WebSocket handlers
- Sets up the HTTP route for the main page
- Starts the web server
The loop() function continuously:
- Cleans up disconnected WebSocket clients
- Updates the physical LED pin to match the
ledStatevariable
Uploading and Testing Your WebSocket Server
Once you've inserted your Wi-Fi credentials, upload the code to your ESP32:
1 Select Board and Port
Select your ESP32 board in Arduino IDE (Tools → Board) and choose the correct port (Tools → Port).
2 Upload Code
Click the Upload button and wait for the compilation and upload to complete.
3 Monitor Serial Output
Open the Serial Monitor (Tools → Serial Monitor) at 115200 baud to see the ESP32 connecting to Wi-Fi and displaying its IP address.
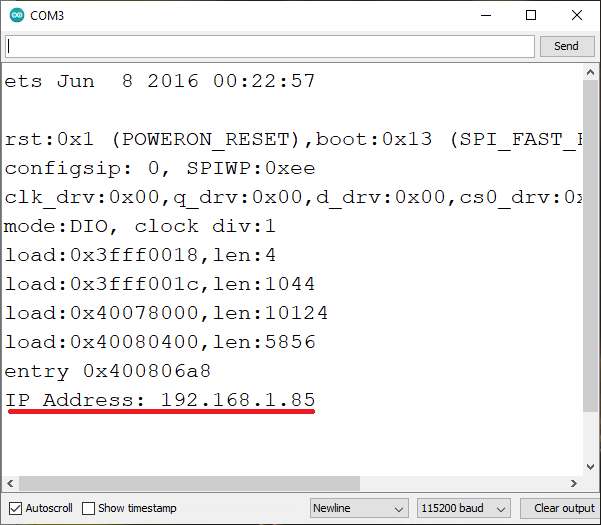
4 Access Web Interface
Note the IP address displayed in the Serial Monitor. Open a web browser and navigate to this IP address to access your WebSocket control interface.
Demonstration and Real-World Testing
Open a web browser and navigate to your ESP32's IP address. You'll see the clean web interface with the current GPIO state and a "Toggle" button.
Try these tests to verify WebSocket functionality:
Test Scenarios
- Single Device Test: Click the toggle button and observe the state change
- Multiple Tabs Test: Open several browser tabs to the same IP address. Click the button in one tab—all tabs should update simultaneously
- Multiple Devices Test: Access the web interface from different devices (phone, tablet, another computer). Changes from any device should appear on all devices instantly
- Connection Resilience: The JavaScript automatically attempts to reconnect every 2 seconds if the WebSocket connection drops, ensuring robustness
Expanding the Project
While we're controlling just GPIO 2 in this example, you can easily extend this to:
Control Multiple GPIOs
Add more buttons and state variables to control additional outputs. You would need to:
- Add more state variables and pin definitions
- Expand the HTML interface with additional controls
- Modify the WebSocket message protocol to handle multiple controls
- Update the message handler to process different commands
Read Sensor Data
Push sensor readings to all connected clients automatically. This is perfect for:
- Temperature/humidity monitoring
- Motion detection alerts
- Environmental sensor dashboards
- Real-time data visualization
Advanced WebSocket Features
Enhance your project with advanced capabilities:
- Create a Dashboard: Build a complete IoT control panel with multiple controls and indicators
- Add Authentication: Implement WebSocket authentication for secure applications
- Use the SPIFFS Filesystem: Store HTML, CSS, and JavaScript in separate files for easier management
- Implement Binary Data: Send binary data for more efficient communication
Troubleshooting Common Issues
WebSocket Connection Fails
If WebSocket connections fail to establish:
- Ensure both ESPAsyncWebServer and AsyncTCP libraries are installed correctly
- Check that your firewall isn't blocking WebSocket connections (port 80)
- Verify the ESP32 is connected to Wi-Fi (check Serial Monitor)
- Try accessing with different browsers (Chrome, Firefox, Edge)
Can't Connect to Wi-Fi
If the ESP32 fails to connect to your Wi-Fi network:
- Verify your credentials and that you're using 2.4GHz network (ESP32 doesn't support 5GHz)
- Check that your Wi-Fi network is within range
- Ensure your router isn't blocking the ESP32 MAC address
- Try resetting the ESP32 and uploading the code again
Multiple Clients Not Syncing
If connected clients show different states:
- Check that
notifyClients()is called after every state change - Verify all clients are connecting to the same ESP32 IP address
- Open browser developer tools (F12) and check the Console tab for JavaScript errors
- Ensure all clients have JavaScript enabled
Compilation Errors
If you encounter compilation errors in Arduino IDE:
- Ensure you have ESP32 board support installed in Arduino IDE
- Verify you've installed the correct library versions
- Check for duplicate library installations
- Try cleaning the build cache (Sketch → Clean Cache)

Conclusion
You've successfully built an ESP32 WebSocket server that enables real-time, synchronized control of GPIO outputs across multiple clients. This approach represents a significant improvement over traditional HTTP-based ESP32 web servers for applications requiring instant updates and multi-client synchronization.
Remember that while we embedded the HTML directly in the Arduino sketch for simplicity, larger projects benefit from using the SPIFFS filesystem to store web resources separately. This makes editing your interface much easier without modifying and re-uploading the entire program.
This implementation provides a solid foundation you can adapt and expand for your specific IoT projects. The real-time bidirectional communication capabilities of WebSockets significantly enhance the user experience of ESP32 web interfaces, making them feel more like native applications than traditional web pages.
Experiment with adding more controls, integrating sensor data, or creating a complete home automation dashboard. The WebSocket approach scales well and maintains excellent performance even with multiple connected clients. Happy coding with your ESP32 WebSocket server!