Introduction to ESP32 Troubleshooting

The ESP32 microcontroller is a powerful and versatile platform for IoT projects, but like any development board, it can present challenges during setup and programming. This comprehensive guide addresses the most common ESP32 problems you might encounter when using the Arduino IDE, providing practical solutions and workarounds.
Understanding ESP32 Hardware Variations
Before troubleshooting software issues, it's crucial to understand hardware differences. Espressif (the ESP32 manufacturer) discovered silicon design errors in early versions that might cause unexplained behavior:
Issue 3.1
Related to power-up and deep sleep wake-up problems
Issue 3.4
Related to not restarting on brownout (voltage drops)
The original v0 and v1 chips were used in modules labeled ESP32-WROOM-32. These errors have been fixed in modules ESP32-WROOM-32E and any other ESP32 designations ending in "E." When purchasing ESP32 boards, look for the "E" variant to avoid these hardware-related issues.
1. Installing ESP32 Add-on for Arduino IDE
1 Basic Installation Process
To program the ESP32 with Arduino IDE, you need to install the ESP32 board support package. While specific steps vary by operating system, the general process involves:
- Opening Arduino IDE and navigating to File → Preferences
- Adding the ESP32 board manager URL to "Additional Board Manager URLs"
- Opening Tools → Board → Boards Manager
- Searching for "ESP32" and installing the latest version
- Selecting your specific ESP32 board from Tools → Board menu
2. Missing ESP32 Boards in Arduino IDE Tools Menu
2 Windows-Specific Solution
If you don't see ESP32 boards in your Arduino IDE after installation:
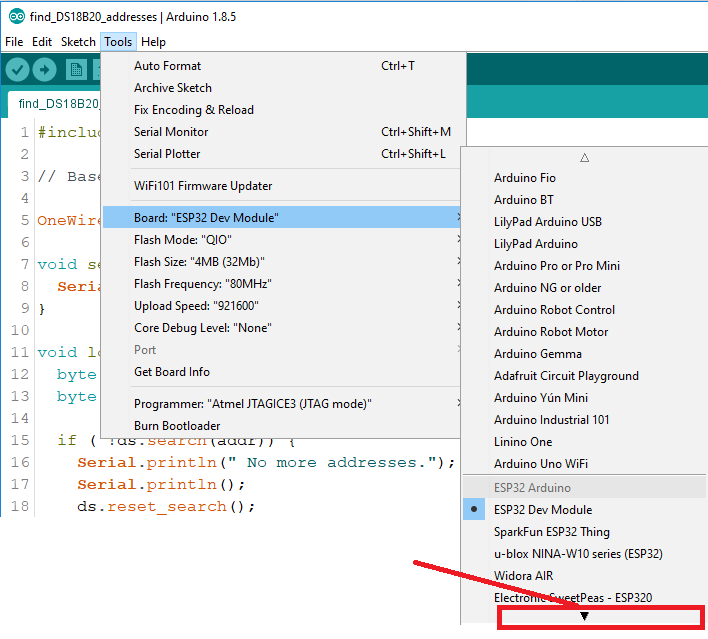
Common Fix: Click on the small arrow in the Boards menu to scroll through all available boards. The ESP32 boards might be further down than expected.
If boards are still missing: Completely restart the installation process from scratch. Remove any previous ESP32 installations from your Arduino hardware folder and reinstall via Boards Manager.
3. "xtensa-esp32-elf-g++: file does not exist" Error
3 Compilation Error Fix
This error typically appears after installing the ESP32 add-on when Arduino IDE fails to compile code:
C:\Users\User\Documents\Arduino\hardware\espressif\esp32\tools\xtensa-esp32-elf\bin\xtensa-esp32-elf-g++: file does not exist
Solution: Re-run the Arduino IDE ESP32 add-on installation. The installation might have been interrupted or incomplete, leaving necessary compiler files missing.
- Close Arduino IDE completely
- Reopen Arduino IDE
- Navigate to Tools → Board → Boards Manager
- Find the ESP32 package and reinstall it
- Restart Arduino IDE after installation completes
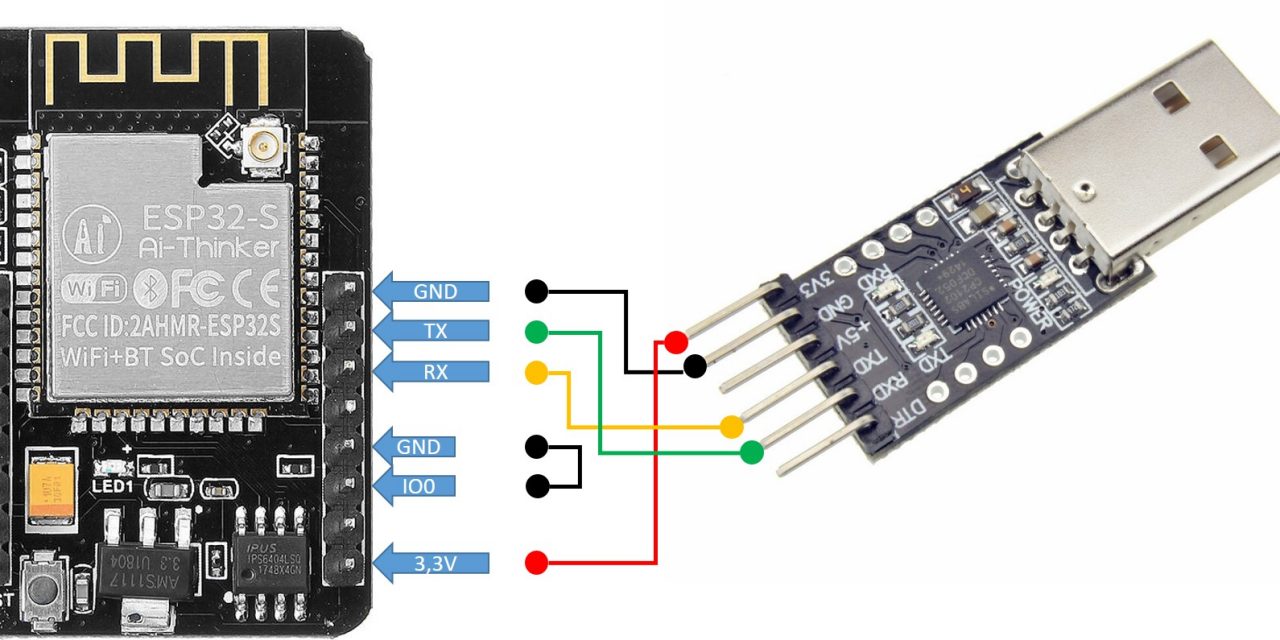
4. "Failed to connect to ESP32: Timed out" Error
4 Upload Connection Problem
When attempting to upload a new sketch, you might encounter:
A fatal error occurred: "Failed to connect to ESP32: Timed out... Connecting..."
This usually means your ESP32 isn't in flashing/uploading mode. Follow this button sequence:
- Hold down the "BOOT" button on your ESP32 board
- Press the "Upload" button in Arduino IDE
- After seeing "Connecting..." in the output, release the BOOT button
- Wait for the "Done uploading" message
After uploading, you may need to press the "ENABLE" (EN) button to restart the ESP32 and run the new sketch.
5. WiFiScan Sketch Compilation Error
5 Library Conflict Resolution
When testing with the basic WiFiScan example, you might encounter:
In function 'void setup()':
ScanNetworks:52: error: 'class WiFiClass' has no member named 'firmwareVersion'
String fv = WiFi.firmwareVersion();
This error occurs because Arduino IDE is using the standard Arduino WiFi library instead of the ESP32-specific WiFi library.
Solution: Remove conflicting WiFi library folders:
Location 1
Arduino IDE installation folder:
arduino-[version]\libraries\WiFi
Location 2
User documents folder:
Documents\Arduino\libraries\WiFi
Move these folders to your desktop (as backup), restart Arduino IDE, and try compiling again. You probably won't use a WiFi shield with Arduino if you're using ESP32, so removing these libraries shouldn't affect other projects.
6. COM Port Not Found or Unavailable
6 Connection Issues
If your ESP32's COM port doesn't appear in Arduino IDE (or appears grayed out), you likely have one of these two problems:
Problem 1: Missing USB Drivers
ESP32 boards use various USB-to-serial chips (CP2102, CH340, FTDI, etc.). Identify your chip and install appropriate drivers:
| Chip | Driver Source | Common Board |
|---|---|---|
| CP2102 | Silicon Labs website | ESP32 DEVKIT V1 DOIT |
| CH340 | Multiple sources online | Many Chinese clones |
| FTDI | FTDI chip website | Official FTDI boards |
Problem 2: USB Cable Without Data Wires
Many USB cables from power banks or chargers are "power-only" without data wires. Your computer can't establish serial communication through such cables. Always use a proper USB data cable for programming.
7. Serial Monitor Displaying Gibberish
7 Serial Communication Fix
If your Serial Monitor displays random characters:
Check 1: COM Port
Ensure you've selected the right COM port in Tools → Port
Check 2: Baud Rate
Set Serial Monitor baud rate to match your Serial.begin() value
Check 3: Line Endings
Configure line ending setting if your sketch expects specific terminators
The baud rate mismatch is the most common cause. Most ESP32 examples use 115200 baud, but check your sketch's Serial.begin() statement to confirm.
8. "Brownout Detector Was Triggered" Error
8 Power Supply Issues
When Serial Monitor constantly prints "Brownout detector was triggered," you're facing a hardware power issue:
Poor USB Cable
Try a shorter, higher-quality USB cable with data wires
Faulty Board
Inspect for visible defects or bad solder joints
Insufficient Power
Try a different USB port, preferably directly on computer
External Power
Ensure adequate current capacity (ESP32 draws up to 500mA)
For persistent issues, use a powered USB hub or provide external power through the ESP32's VIN pin (with proper voltage regulation).
9. Alternative Development Environments
9 When Arduino IDE Doesn't Work
If you've tried all troubleshooting and ESP32 still doesn't work with Arduino IDE, consider alternatives:
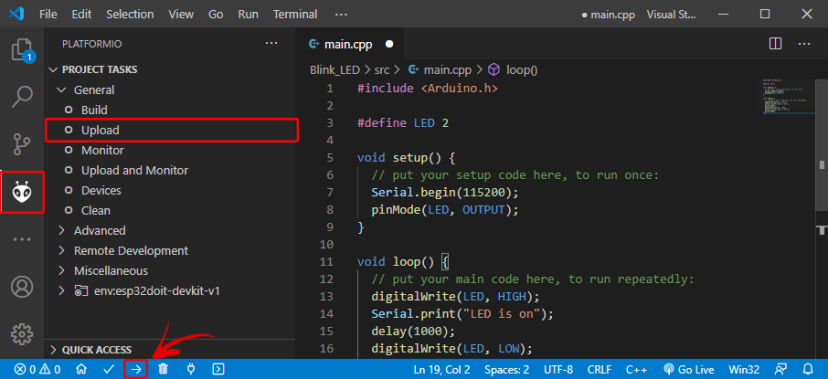
PlatformIO with VS Code
Robust ESP32 support with excellent library management and debugging capabilities
ESP-IDF Directly
Espressif's official framework for maximum control (steeper learning curve)
PlatformIO handles many configuration challenges automatically and supports both Arduino framework and ESP-IDF.
Conclusion and Additional Resources
This troubleshooting guide has covered the most common ESP32 problems encountered when using Arduino IDE. Remember that systematic troubleshooting—checking each component and connection methodically—is key to resolving these issues.
The ESP32 community is active and supportive. If you encounter issues not covered here, check the official ESP32 forum, GitHub repositories, or Stack Overflow for additional help.